Even though Oscar has always been one of my favorite Muppet characters (I like him for the same reason I like Tony Clifton – he’s rather charmingly abrasive) the thought didn’t occur to actually build one until I won a tour of the Henson Creature Shop in a charity auction late 2016.
I was able to take one other person along on the tour, and of my friends who I knew would enjoy it the most was my pal Paul Dini. Like me he’s been a lifelong Muppet fan, and his Muppet fandom no doubt inspired him to get into the entertainment industry.
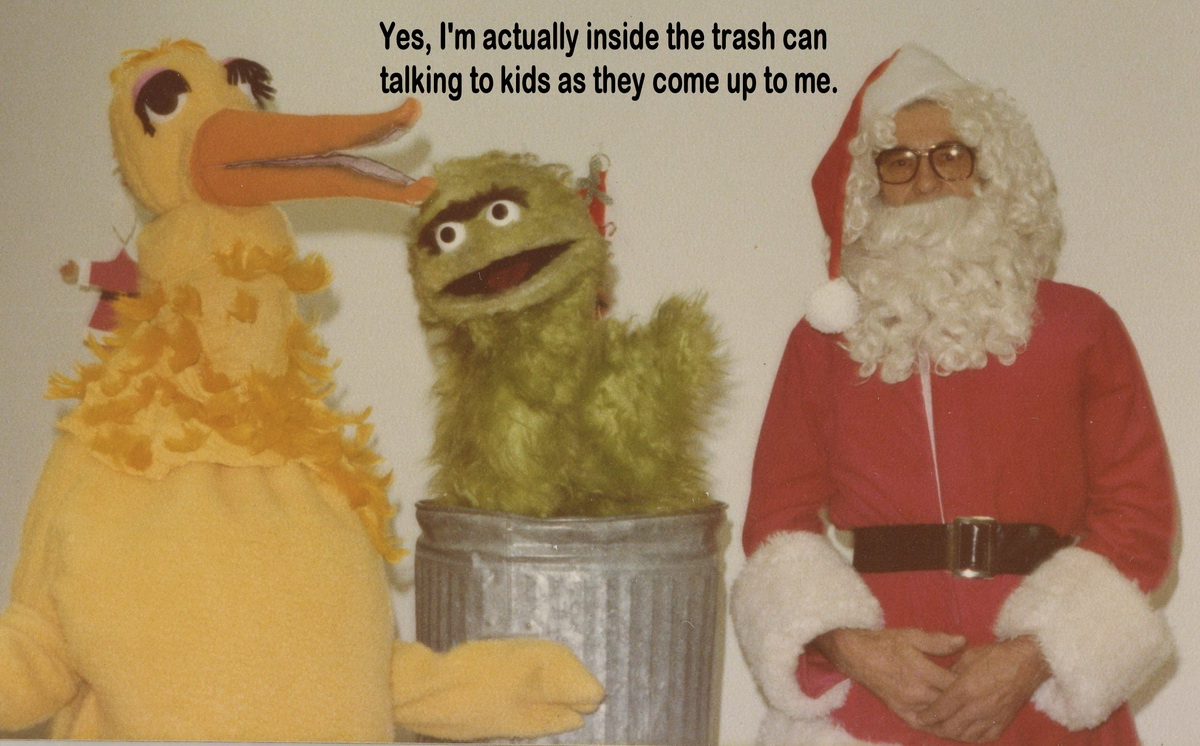
In the conference room of the Henson Creature Shop was an actual Oscar the Grouch – on display in his signature trash can. Paul and I immediately became 8 years old again! I thought a display just like that would look great in Planet Wallywood, but it would be very difficult to create.
Oh sure I had built an Oscar back in the early 80’s (along with about 22 other puppets) but it wasn’t very good. It sufficed for the little puppet shows I was doing around the Sioux Falls, South Dakota area (I even had a trash can fabricated that I could get inside to operate him) but it was far from a 1:1 exact replica for the discerning taste of the adult Muppet fan I had become.

I already had commissioned exact 1:1 Muppet replicas of Kermit the Frog, Gonzo and Animal from a professional fabricator, and I liked how they looked displayed in my house. I have a dedicated Puppet Room in Planet Wallywood, which features all sorts of puppets and puppet-related toys on display. I asked the fabricator if he could build an Oscar for me, but he was very busy and the delivery time was in the distant future. So I started fooling around with the idea of dusting off the old puppet-building skills and creating one myself.
Right around that time I commissioned a Mahna Mahna replica from a puppet fabricator in New York. As I began the search to source the necessary materials, I came across a mossy-green faux alpaca fur for his vest. When it arrived I realized that it would make excellent Oscar fur. My Oscar obsession was back on!

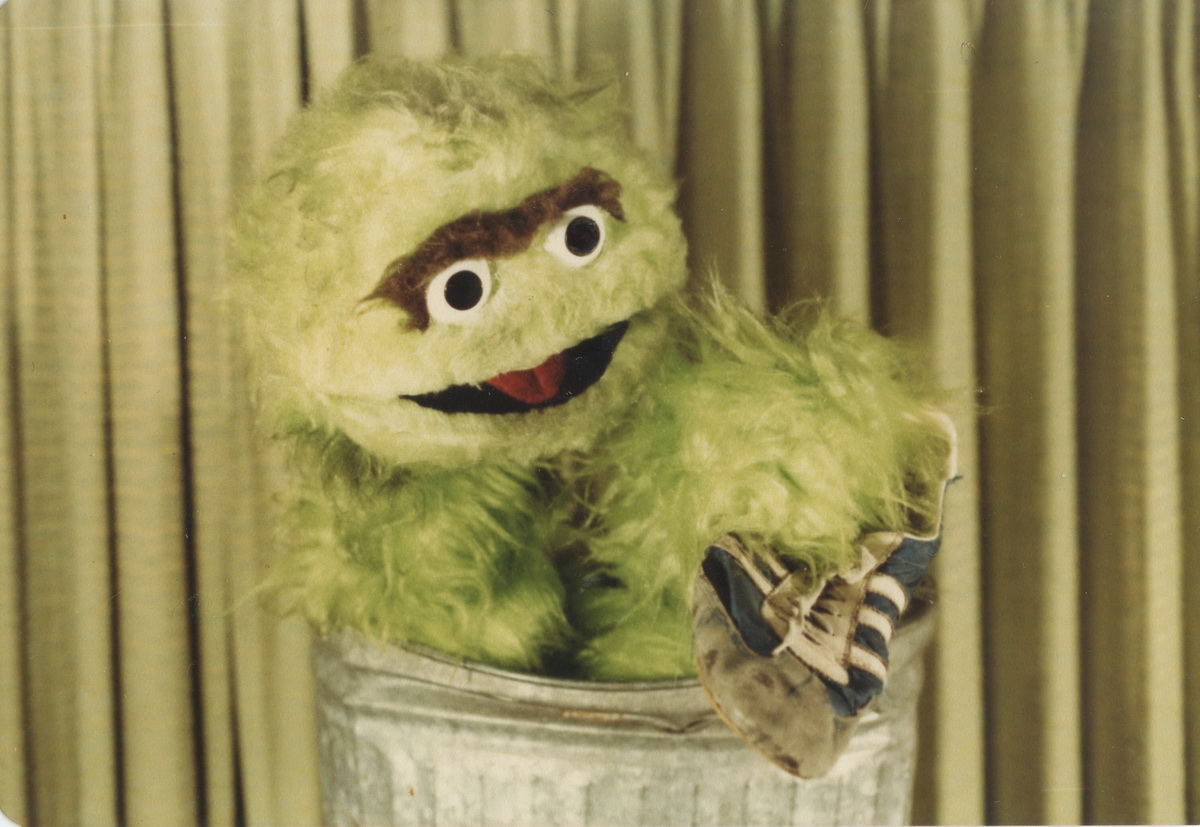
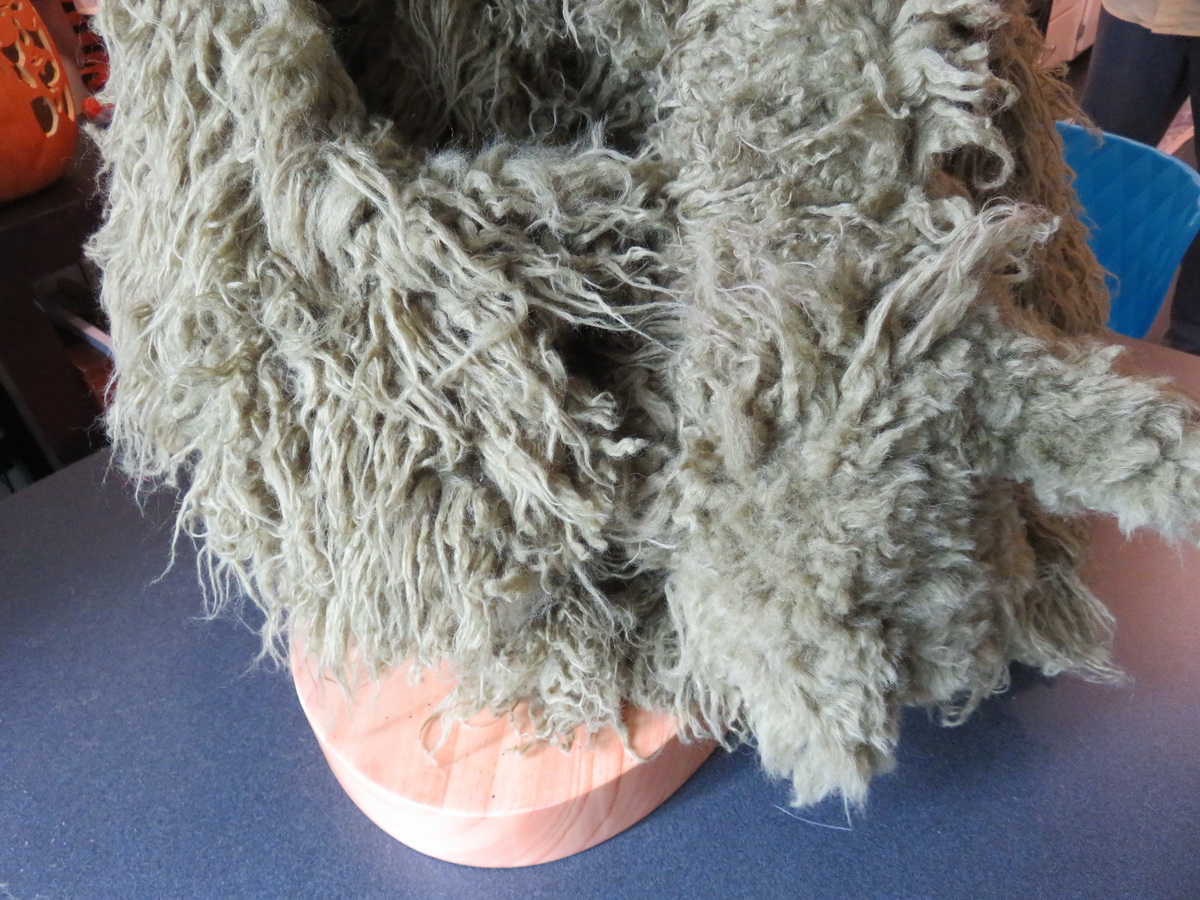
Unlike the days of puppet building when I was 19, I had a wealth of resource materials available through the internet. Back in the early 80’s all I had to work with were photos in books, posters and calendars. I noticed that there had been several generations of Oscars throughout the years since his creation in 1969. But I settled on the Oscar that I knew from childhood. Unlike the Oscar of today, who’s bright green and clean, I wanted the ratty, filthy, matted dull green Oscar from the early 70’s.
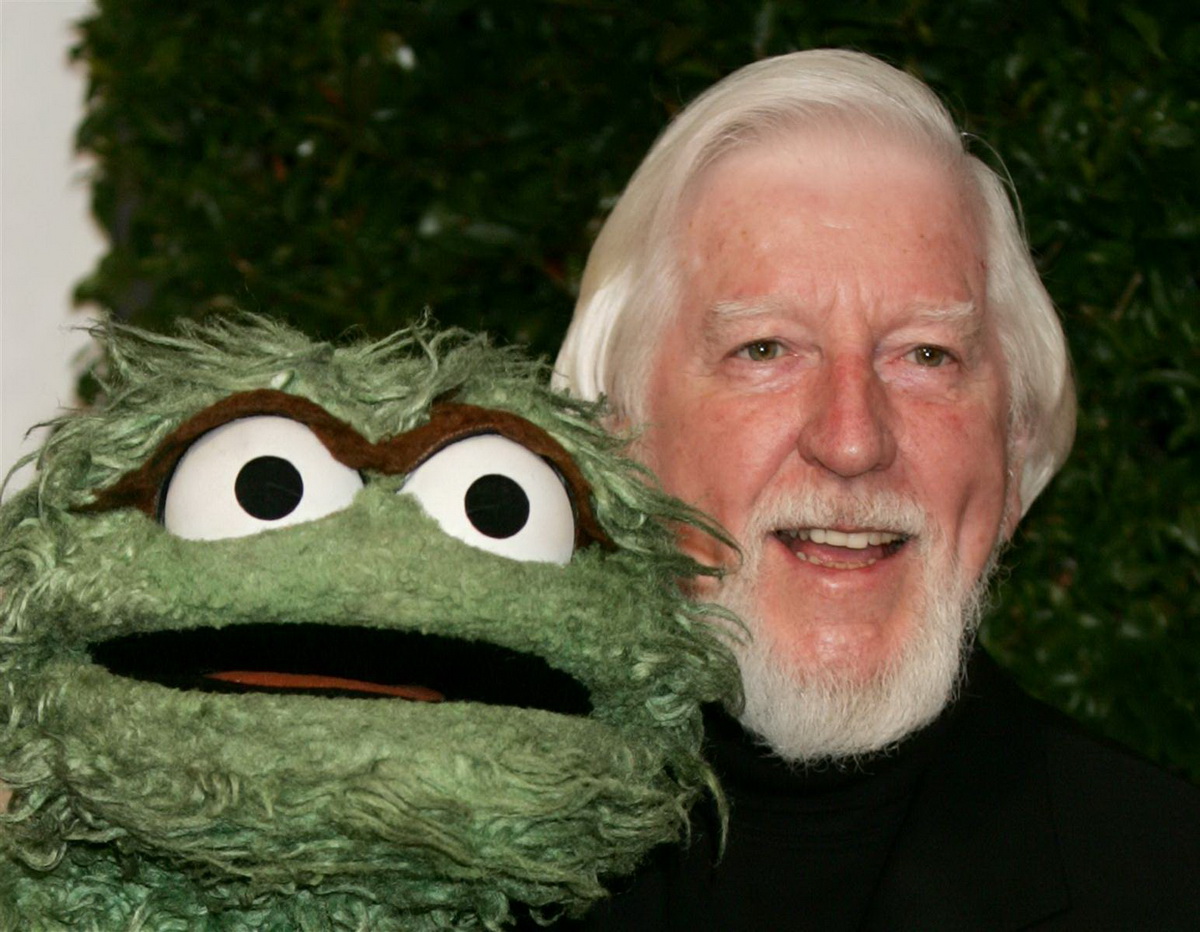
From eyeballing several photos of a real Oscar, I determined what I felt were the proper sizes for his head. I had seen many photos of Oscar being held by the legendary Carroll Spinney, and when I compared Oscar’s head to Carroll’s, I realized that Oscar was approximately 1.5 “Carroll heads” in width. So if the average human head was 6” across, and Oscar was that plus a half, I figured his width was most likely 9” across. (Some time later, secret Henson intel that I acquired through one of my industry operatives confirmed that to be the case!)
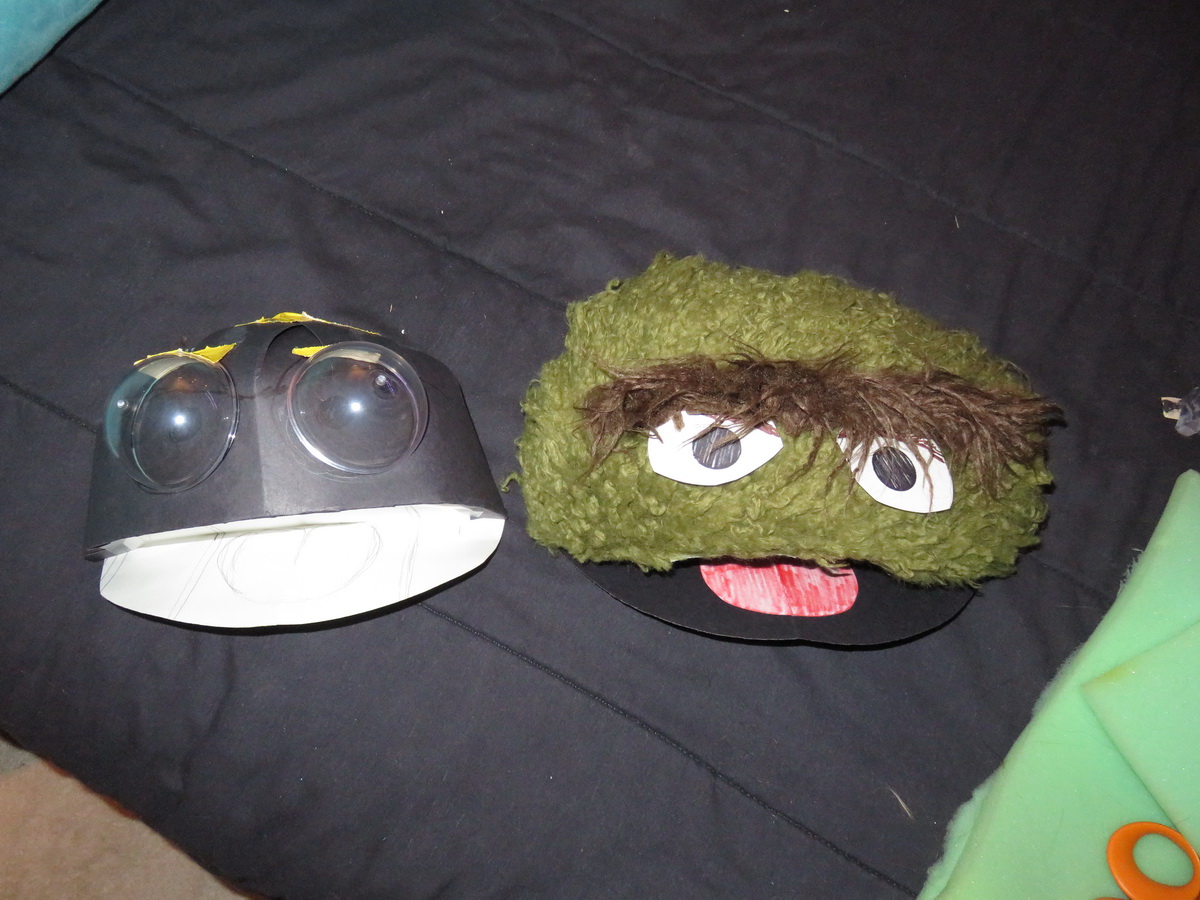
I built a test Oscar head out of poster board and covered it with some of the green fur – just to see how the sizing parameters looked in a three dimensional format. Then I ordered some more faux alpaca fur in brown for possible eyebrow material. And when it arrived I got a bit sidetracked. I realized the fur would make an excellent Rowlf!
Since the “frown” mechanism of Oscar’s unibrow was somewhat above my skill level at that point, I decided to dive back into puppet building with a simpler project. Rowlf seemed like the perfect project to start with. He had a simple design, I’ve always loved the character, and my first dog was named after him back in the 60’s! While I started in on Rowlf I kept at the puppet fabricator I knew to try and find time to make an Oscar for me.
He sent me pictures of an Oscar that was made by a fabricator he knew, but it looked a little too “off-model” for my tastes. I was hoping for something a little more exact. I figured I wasn’t going to get what I wanted unless I did it myself.
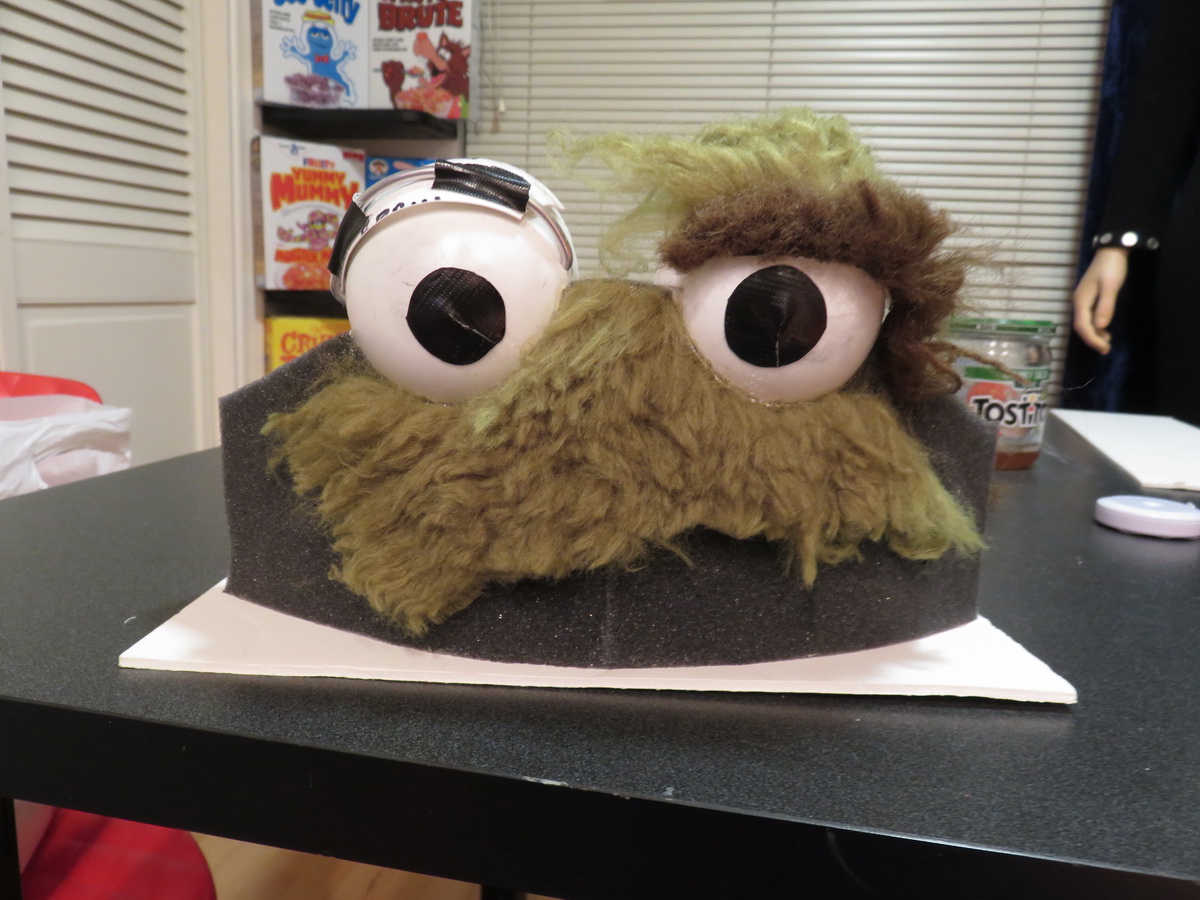
In the meantime I kept working on Rowlf, and got him completed in time to unveil him at the 2019 WonderCon in Anaheim. The reactions I got inspired me to get moving on completing my Oscar. So I took what I had learned so far about how Oscar’s “frown mech” worked, and built a prototype out of vaccuformed plastic eyes, foam rubber, armature wire, and foam core. The basic principles were all there.
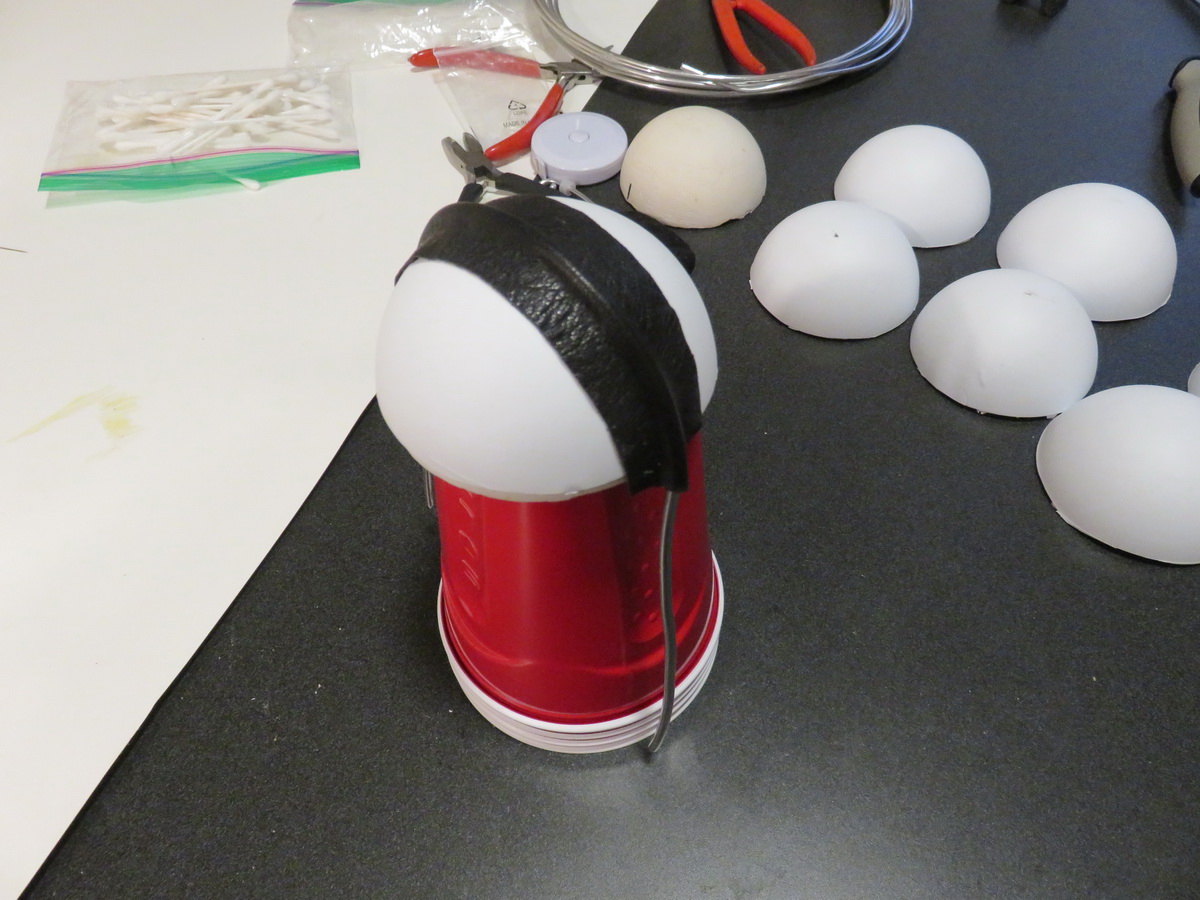
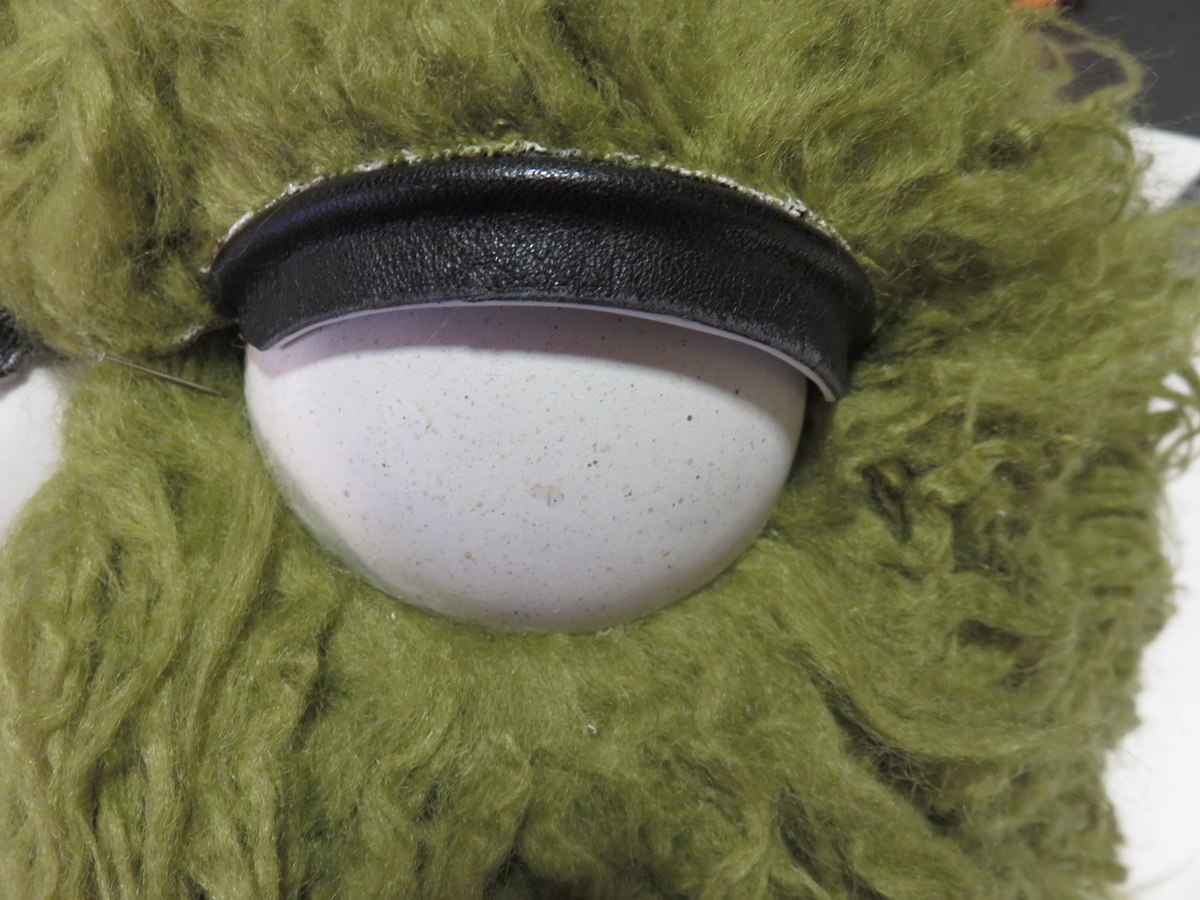
I purchased several 3” and 3.5” acrylic domes at a craft store. The acrylic pieces themselves wouldn’t be very good for eye pieces because of the tiny “nipple” on the top from where the acrylic material was injected. But I could make suitable vaccuform “bucks” from those pieces.
A “buck” for the vaccuform process is a rigid piece (often made from a plaster-like substance called Hydrocal) that the plastic will be molded around. The buck is placed on a ventilated platform with industrial-strength suction underneath it. Above it is a large heating element with a frame, between which a large sheet of styrene plastic is fastened. The heating element heats up the plastic making it very pliable and soft, and at the right moment the frame is lowered over the ventilated platform, the suction is turned on, and it sucks the warm plastic around the contours of the buck; making a perfect, hollow plastic replica of the buck. When the plastic cools, the buck is removed and the sheet of styrene is cut to size.
I coated the insides of the acrylic domes with Vaseline (for a mold release) and poured in Hydrocal. Once they hardened I removed them from the acrylic domes and had my bucks. The 3” domes would be used for Oscar’s eyeballs, and the 3.5” domes would be used for his eyelid pieces. I needed a slightly larger piece for the eyelids so when they moved over the eyeballs they had plenty of room to move without touching the eyeball pieces.
When I was a kid my dad was doing some work around the house using “toggle bolts” (also known as Molly bolts.) They allow you to hang stuff on a wall when there’s no stud behind the drywall to support it. The toggle bolt is a little spring-loaded V-shaped metal piece that compresses so you can get it through the hole in the wall. Then once it’s through the drywall the spring mechanism makes it spread out so it anchors into the wall. I always thought those little devices would be good for blinking puppet eyebrows. So I set about designing a toggle bolt mechanism to operate Oscar’s unibrow.
I even consulted a special effects house to assist me in making a suitable frown mechanism based on my original prototype, and I took them my first Oscar head. But what I got in return was much too high tech to work. It would have been great for an animatronic, but it wasn’t conducive for operation by a human hand.
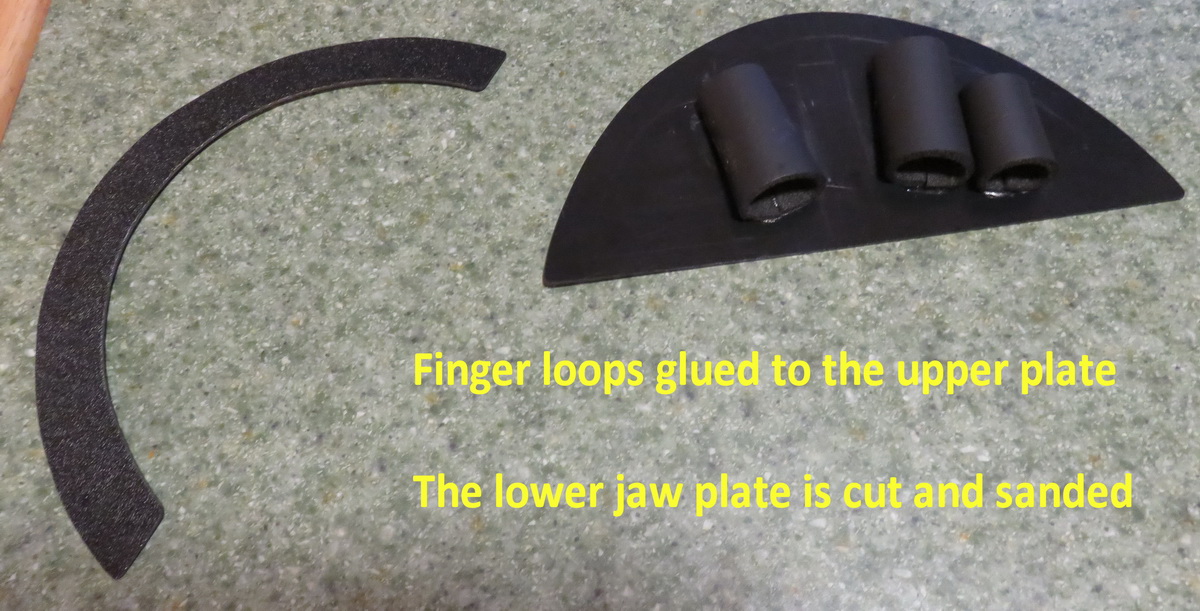
So I went back to the drawing board and designed a toggle bolt mechanism for my middle finger that would bolt into the upper mouth plate, and have wires running through it which would operate the eyelid pieces through the back.
My Christmas 2019 project was building a second Oscar head. Again, I cut the mouth plates out of ABS plastic, and started attaching the foam rubber to the mouth plates; one for the head, and one for the lower jaw. I bolted in the mechanism I built and added leather finger loops. But it still wasn’t giving me the fluid movement I needed.
I just wasn’t able to wrap my head around how exactly it would work. My fatal error was not thinking like 1969. What was the simplest way they would have done it 50 years ago? Though I had what I thought was a clever gizmo, it ended up being overkill for what I needed.
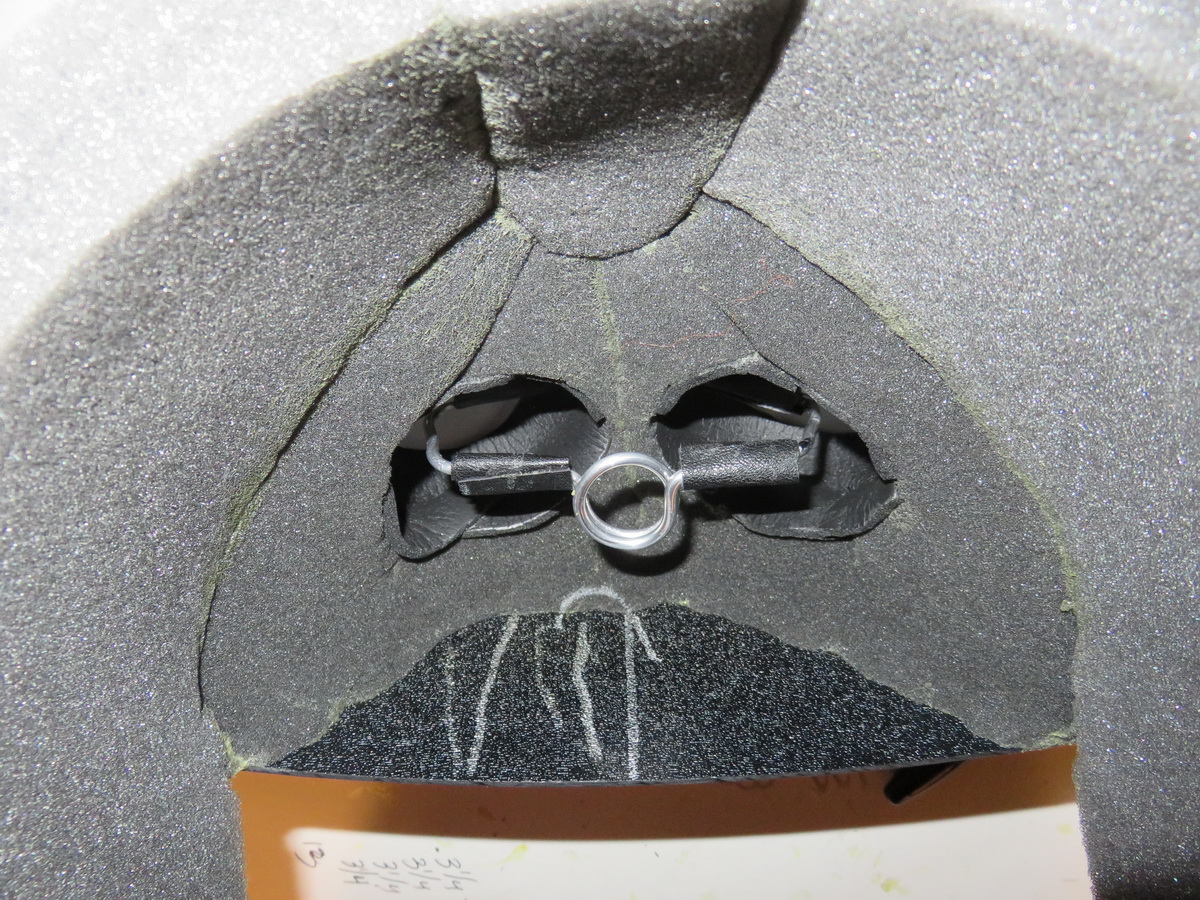
Then I remembered what a puppeteer in New York once told me. He said that Carroll Spinney once told him that when Oscar frowned, he (Carroll) was actually flipping off the world. And nobody knew it. That told me that the middle finger that operated Oscar’s frown went up, when Oscar’s unibrow went down. I spent a lot of hours in bed thinking about it and then it hit me!
Like I had on my original prototype, it was probably just a simple ring mechanism in between the two eyes that operated the unibrow. I knew that Big Bird’s eyelids were operated by a ring mechanism, so I started building a new mouth plate to start on a third head.
I removed the toggle mechanism from the second head so I could do some more experimentation. But the third head was going to be the charm! I cut a piece of 1” thick foam rubber to size. Then I “beveled” the edge. Beveling is when you give the edge of the foam a slant. It’s hard to cut precisely, but I had to use a long blade to do it. My Exacto knife was too short. I bought some blades that are traditionally used in box cutters, because they’re about 5” long; perfect for sawing through thick foam.
The beveled edge of the foam is Barge glued on to the mouth plate so the angle of the foam leans outward. After it dries, wedged sections are cut out of the foam to give you the backward angle you need for the slant of Oscar’s face. And when the beveled foam is pulled back, it gives the puppet a nice little “top lip.” That’s the type of contoured upper lip you see on Muppets like Fozzie and Scooter.
I cut the bottom mouth plate out of ABS plastic, and unlike Rowlf and Kermit who have solid lower mouth plates, Muppets like Oscar and Animal have “C” shaped mouth plates. The center of the mouth plate is open because they have three dimensional, sculpted-foam tongues. The soft lower plate allows the tongue to “sink” back into the puppet’s lower palette when the mouth is closed. Other Muppets like Kermit and Fozzie have flat tongues cut out of felt.
Speaking of Animal, his unibrow mechanism is different than Oscar’s. Animal’s unibrow is one wire that extends out over both eyeballs, so the unibrow lifts and lowers equally. But because of the angle that Oscar’s eyes are set, each eyeball has their own individual wire system. (More on that later)
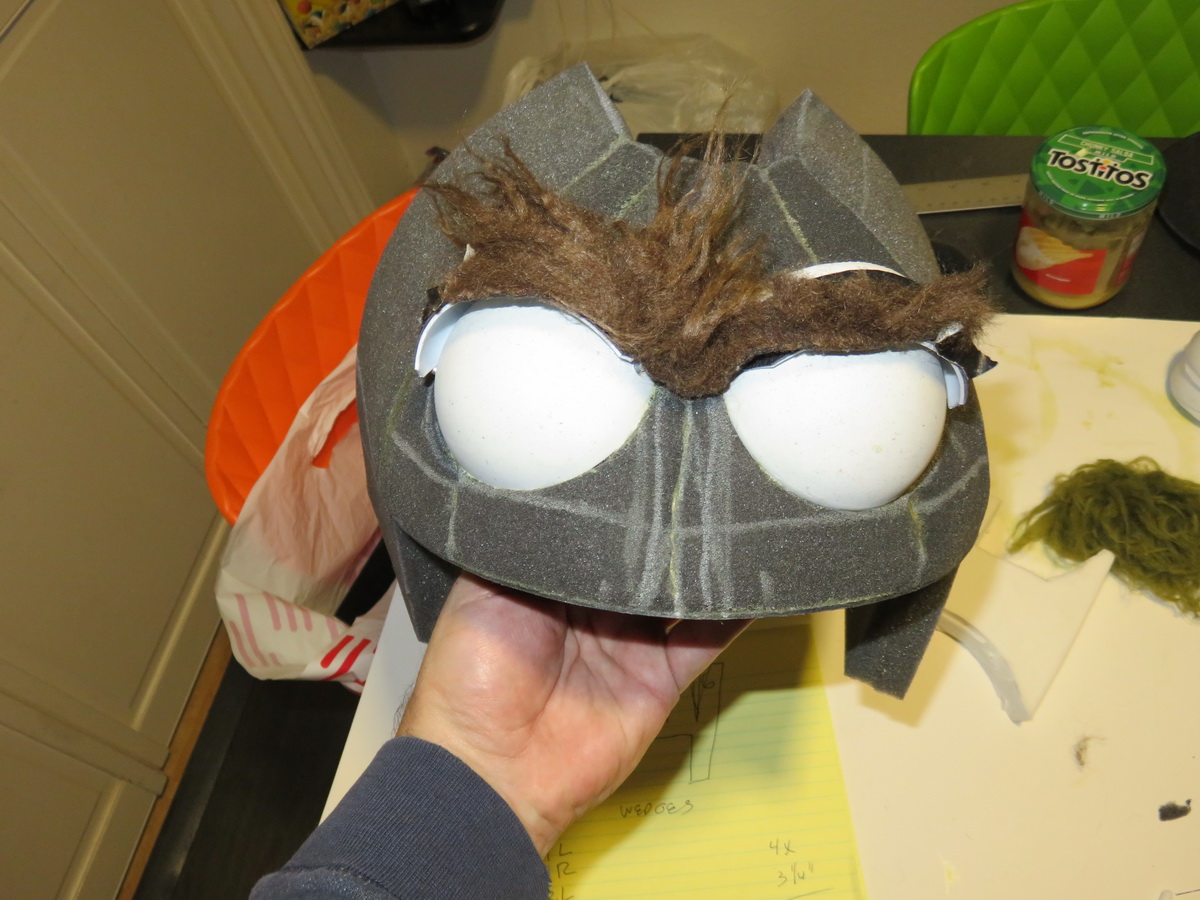
I picked two eyeball pieces that I liked and gave them a good sanding with 600 sandpaper. I noticed that Oscar’s eyes have flecks of gray and beige on them. This is done to take down the vibrancy of the white styrene plastic, since it wouldn’t look right for Oscar to have bright, white, cheery eyes. Sanding them with fine sandpaper made sure the paint would “bite” into the plastic.
First I painted the eyeball pieces with a whitish-grey. My effects guy Jim Ojala taught me the technique of “flicking” paint. This is done when you need to color a piece with fine flecks of different colors to give it dimensionality. I put the eyeballs on the ground, dipped an old toothbrush in some diluted acrylic paint, and ran my finger over the brush’s bristles. This sent tiny drops of paint raining down on to the eyeballs. First I did gray, and then I did some in beige. When I achieved the look I was after, I let it dry. I coated the entire eyeballs with a matte-finish sealer. It’s important to paint the eyeballs BEFORE they’re put into the puppet head, because painting them afterwards would be a real pain.
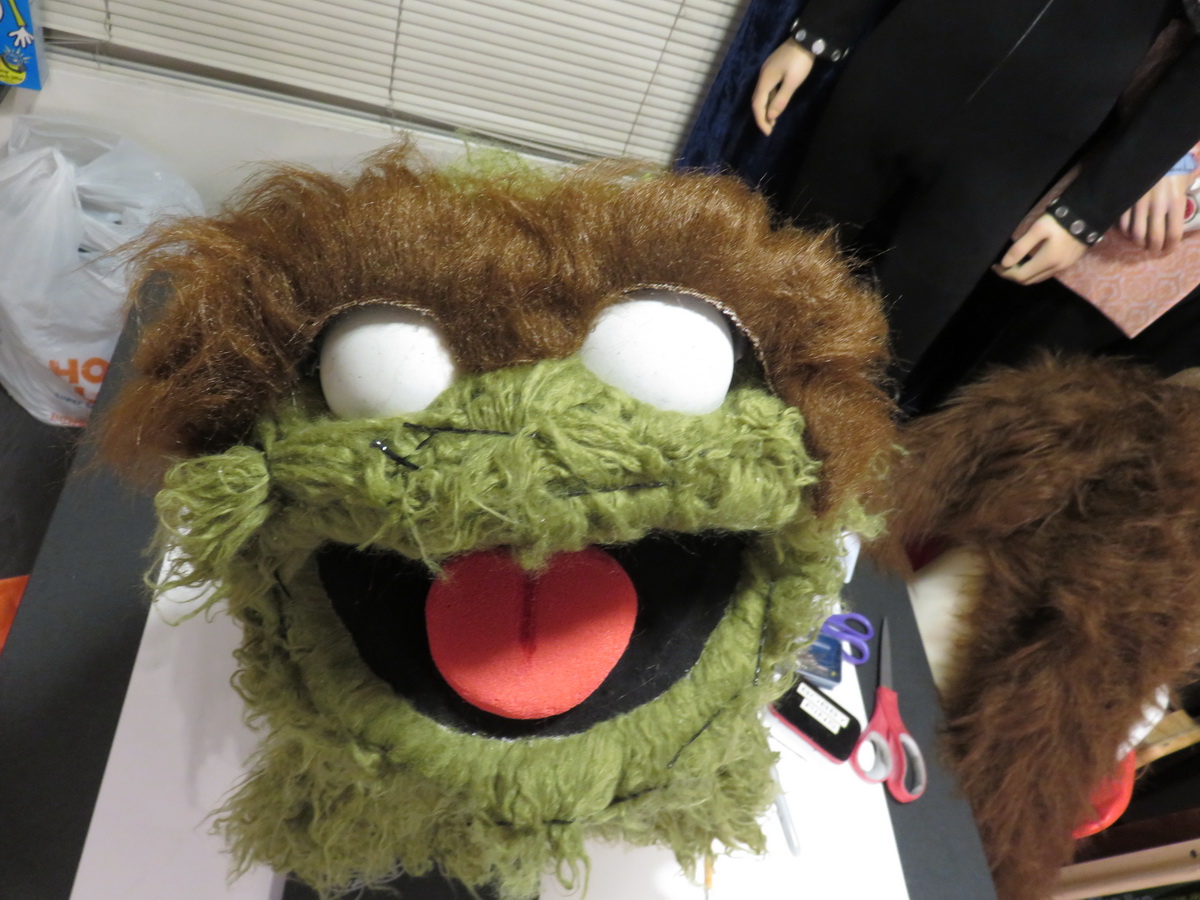
Once I determined the spacing of the eyes on the face, I drew in the measurements on the foam and prepared to cut the holes for the eyeball pieces. Since foam stretches pretty well, I cut the holes slightly smaller than the dimensions of the eye pieces to give them a snug fit once they’re placed.
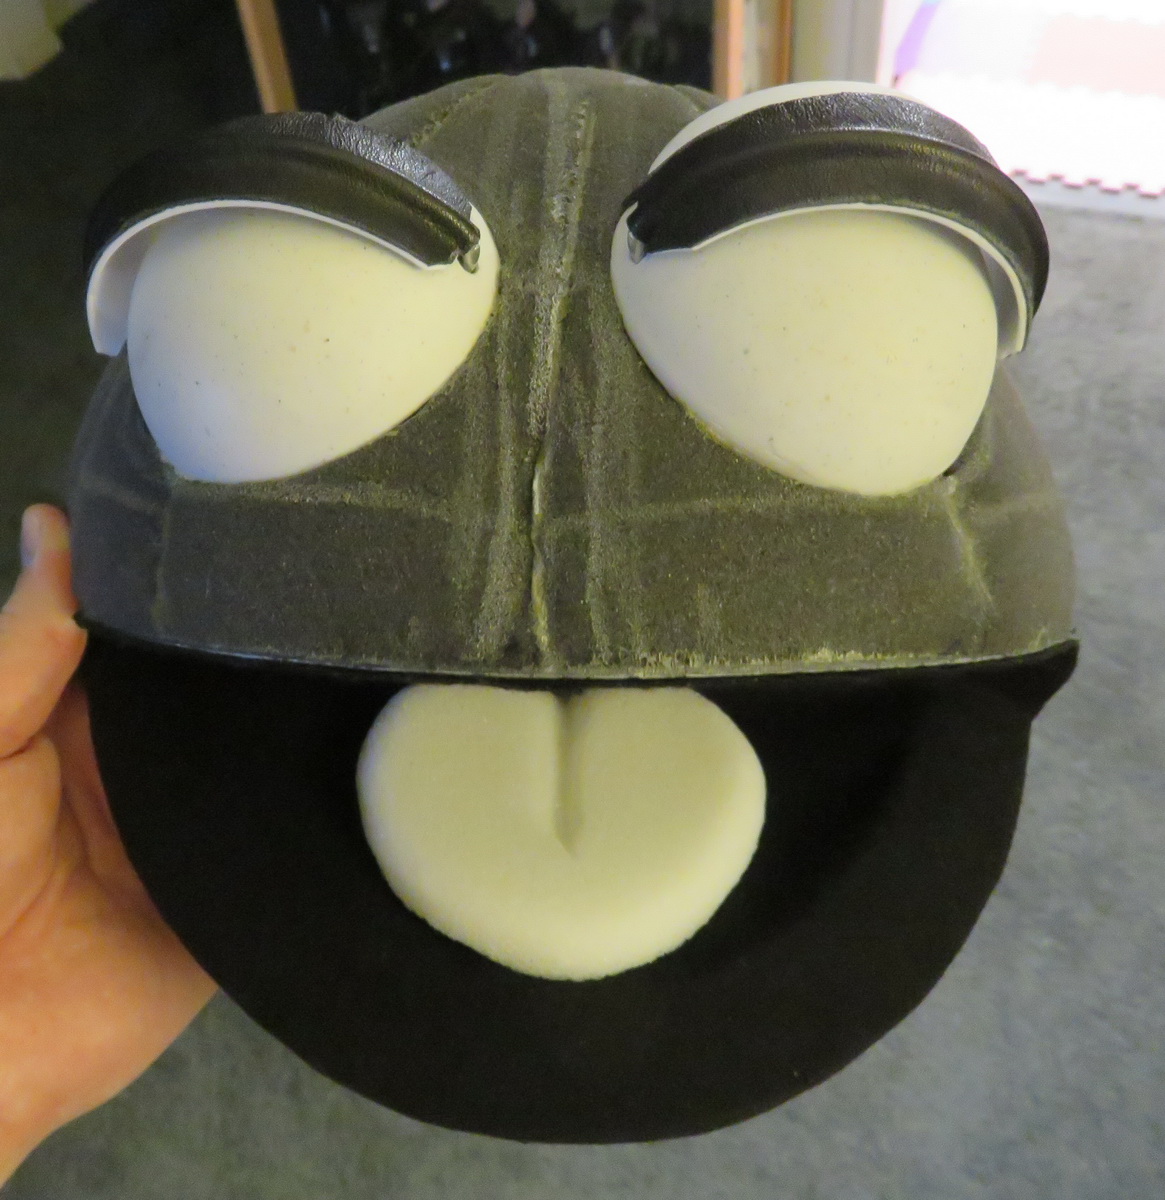
While still on the buck, I took the pieces for the eyelids and attached 3/16” armature wire to them. I bent the wire over the curve of the piece, and ran the wire down the sides, leaving about 5” on either side. This would give me plenty to work with later when they’re installed into the puppet. Since armature wire is difficult to glue to plastic, I took thin pieces of leather and glued them snugly around the wire on either side and attached it to the eyelid pieces. This would ensure the wires on the eyelid pieces wouldn’t move around. After the glue dried, I trimmed the eyelid pieces to the dimensions I needed them. I only needed enough to glue the green fur to on the top, and the brown fur to on the bottom.
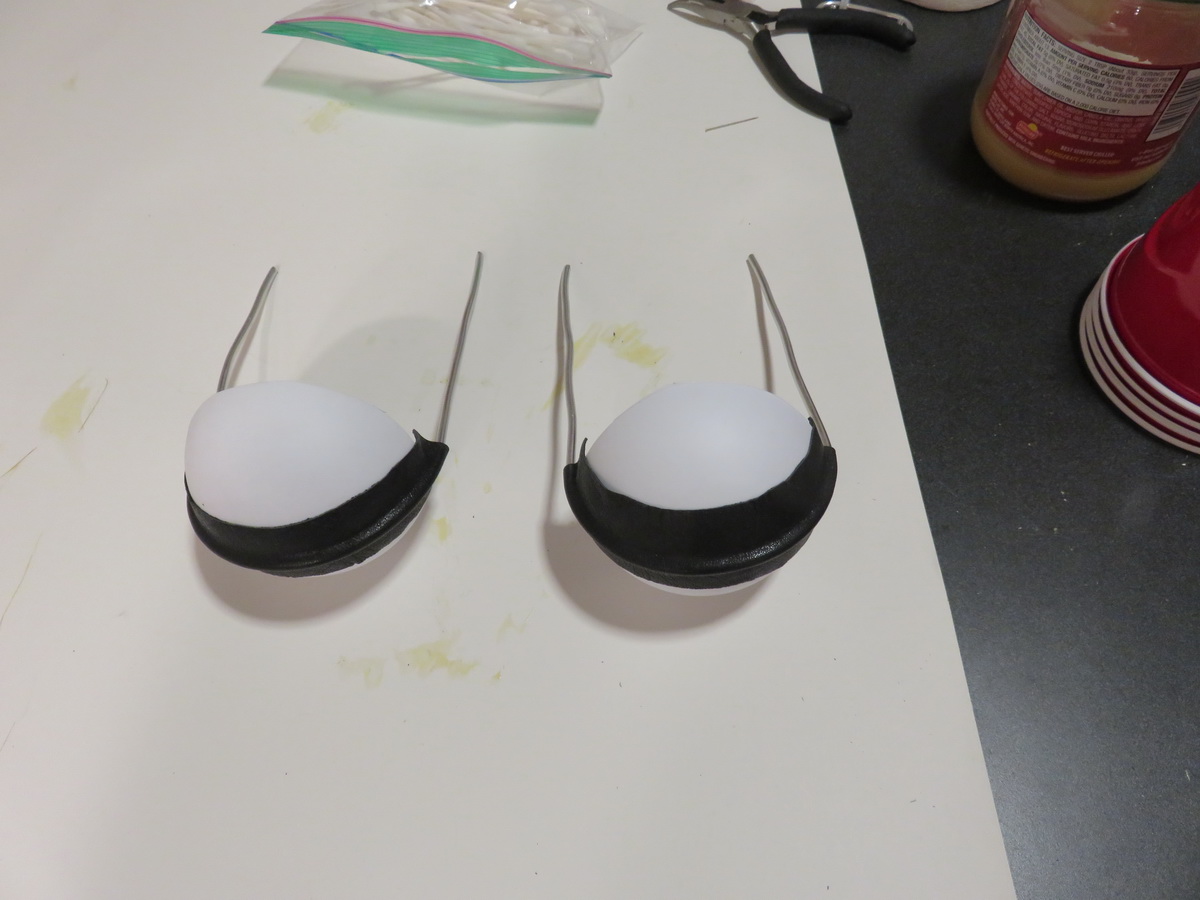
In the sides of the eyeball pieces, I drilled small holes just big enough to accommodate the 3/16” armature wire. Then I threaded the excess wire on the eyelid pieces through those holes, and I had floating eyelid pieces over the eye pieces. Once the wire was through the eyepieces, I bent them at an angle to give me little “pull tabs” to operate the eyelids. Pushing the wire down opened the eyelids wide, and raising the wire up pushed the eyelids pieces down. Because of the way the eyelid pieces “travels” over the surface of the eyeball piece, it really only moves over 1/3 of the eyeball. But you don’t need any more movement than that.
Once the blinking eyelid and eyeball pieces are set, it’s time to put them into the foam face. But since the eyeballs have been painted, the actual surface of the eye can NOT come in contact with any Barge glue. There’s a component in Barge glue that will eat paint so you have to keep the glue away from any painted surface at all costs!
Instead, I had purchased some thin foam-like strips at Foam Mart that I would use to secure the eyeballs into place through the back. I call it “foam tape,” for lack of a better term. I’m not sure if it’s made from something called L200, or neoprene, or what. But it works great. One side is smooth, and the other side is textured. I glued pieces into the inside edges of the eyeballs with plenty of tape left over to secure into the foam head.
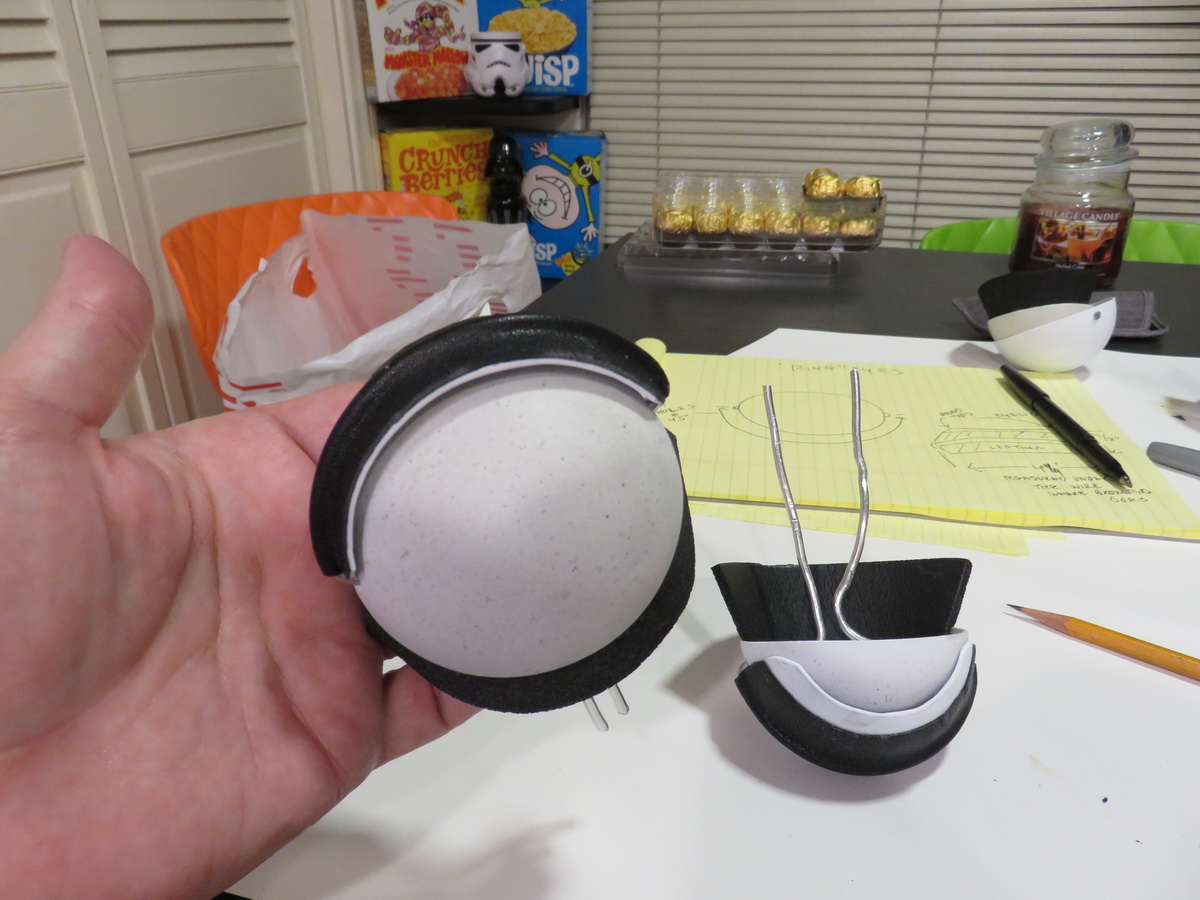
I cut the eyeholes in the foam, set the eye pieces into the head at the angle I liked, and secured them with stick pins. I glued the “foam tape” pieces to the foam head and trimmed off the excess. Then I let it dry for a day. I now had two eyelid and eyeball pieces secured into the head and it was looking really great. When I manipulated the wire “pull tabs” in the back, the blinking mechanism was coming to life!
Where the wires from the eyelids overlapped behind the eyeball I joined them together with little leather strips and Barge glue, while still leaving about 3” of wire for my “pull tabs.” I bent another piece of wire that went straight across about 2 inches, and then I bent it into a ring just big enough to fit my middle finger, and then bent it back out straight for another 2 inches. I bent the pull tabs in each eyeball toward the center of the puppet’s head at 45 degree angles. I joined the angled pull tabs with the finger ring wire and glued them together with little leather strips and Barge glue. Now my ring mechanism would control the up and down movement of the eyelids.
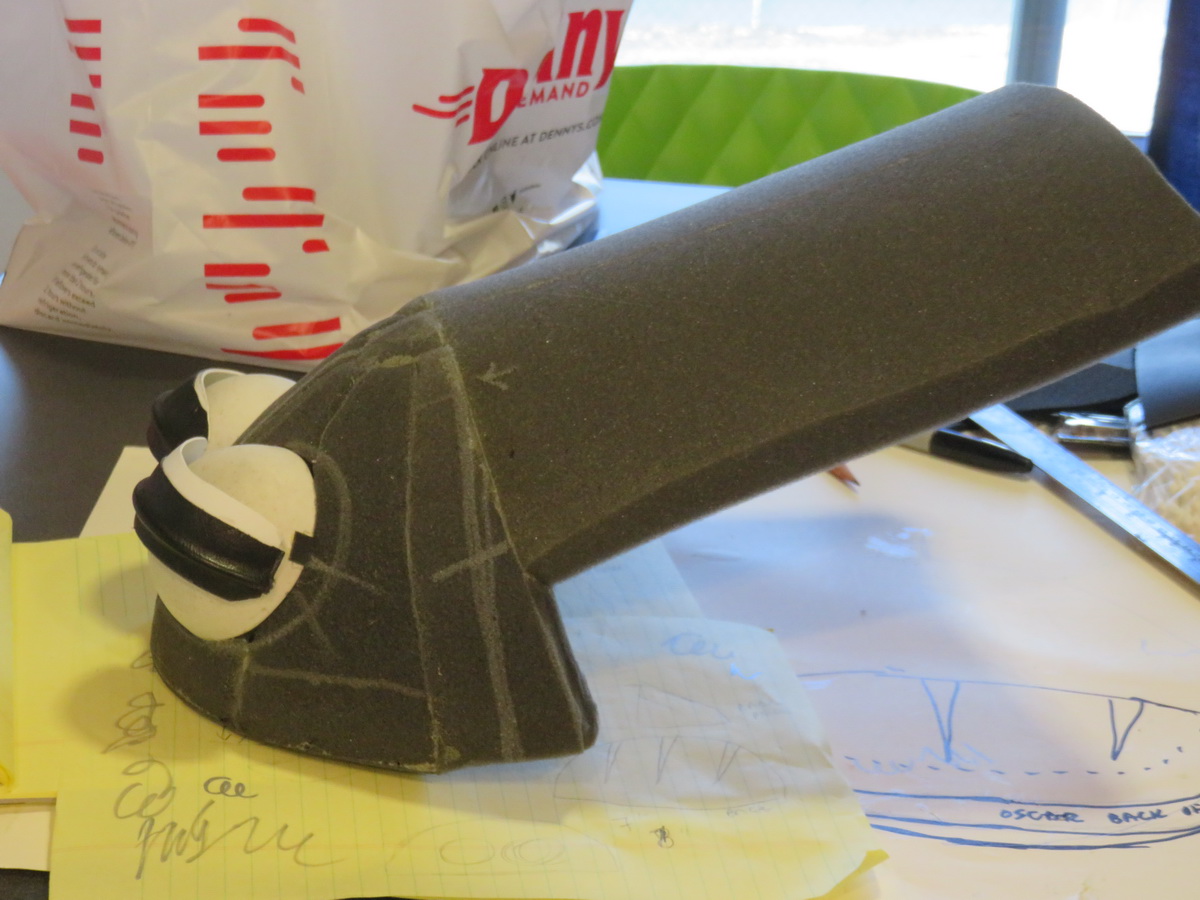
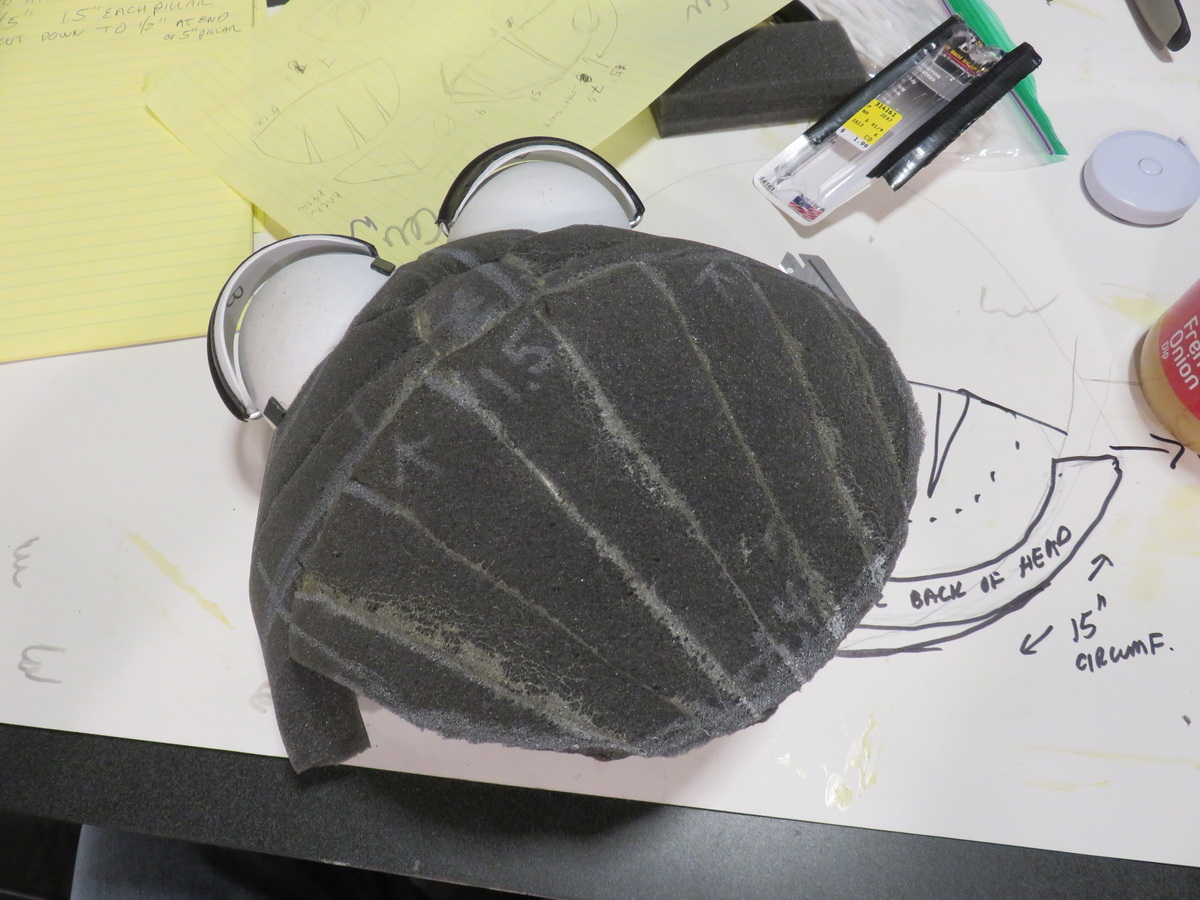
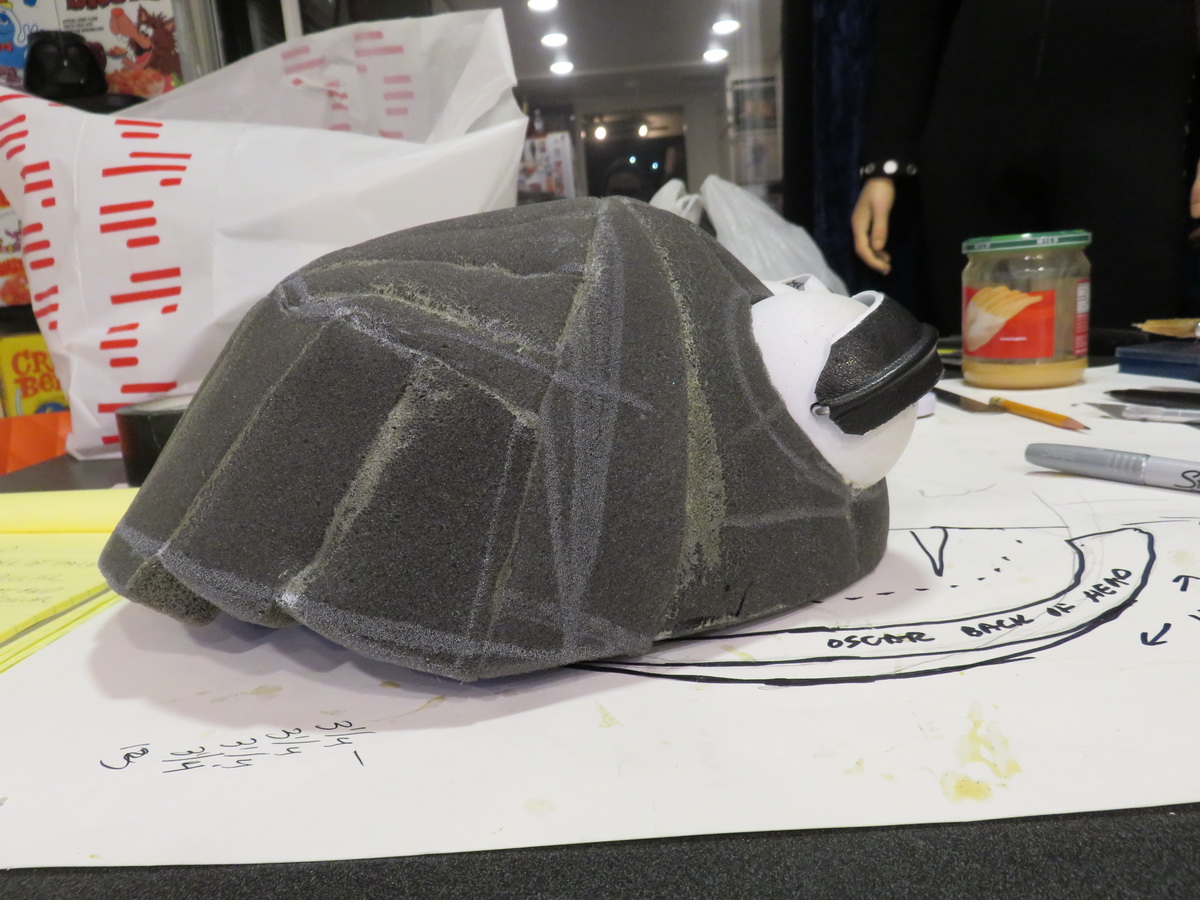
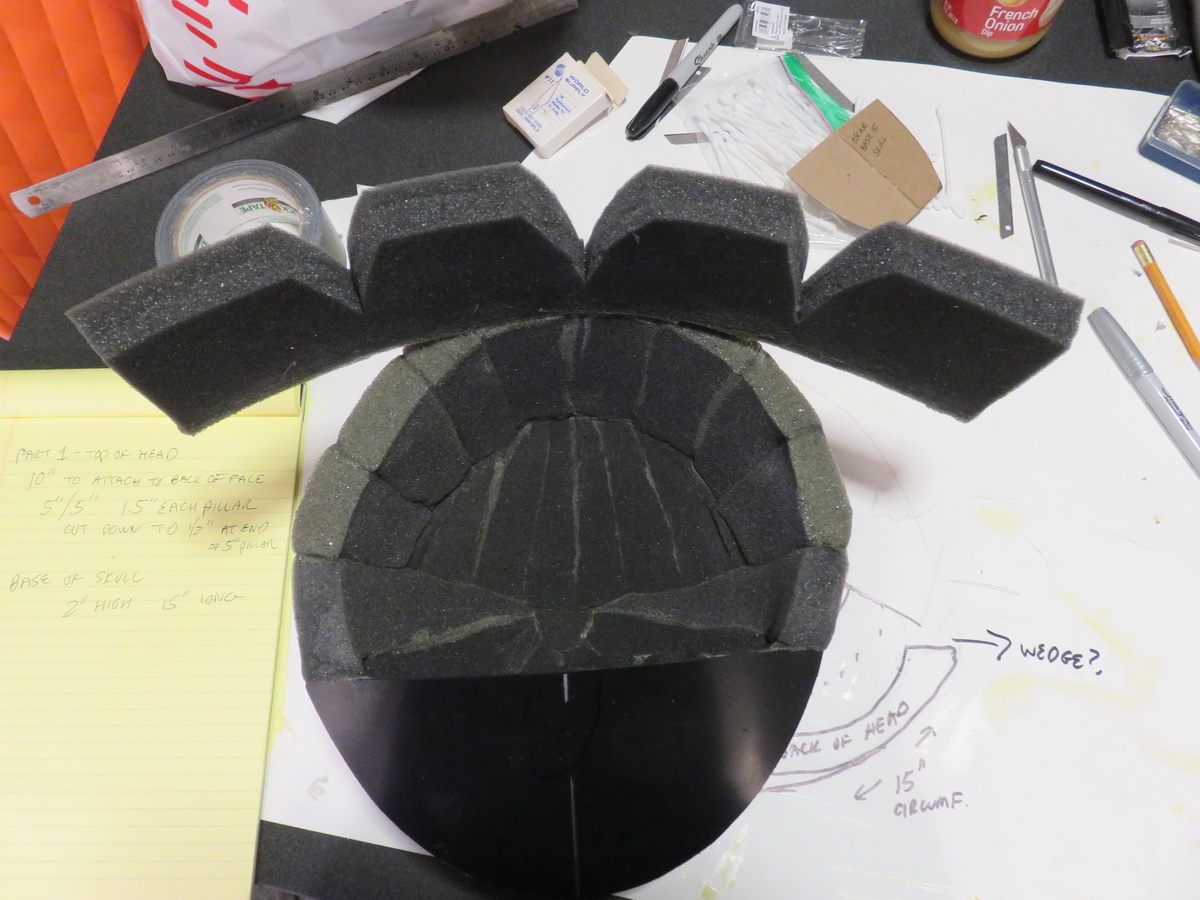
I started building the rest of the head with pieces of 1” thick foam rubber. Some puppets can take a smaller thickness of foam rubber, but because of Oscar’s size, and needing stability to accommodate the constant movement and pull of the eyelids, I opted for a beefier thickness of foam.
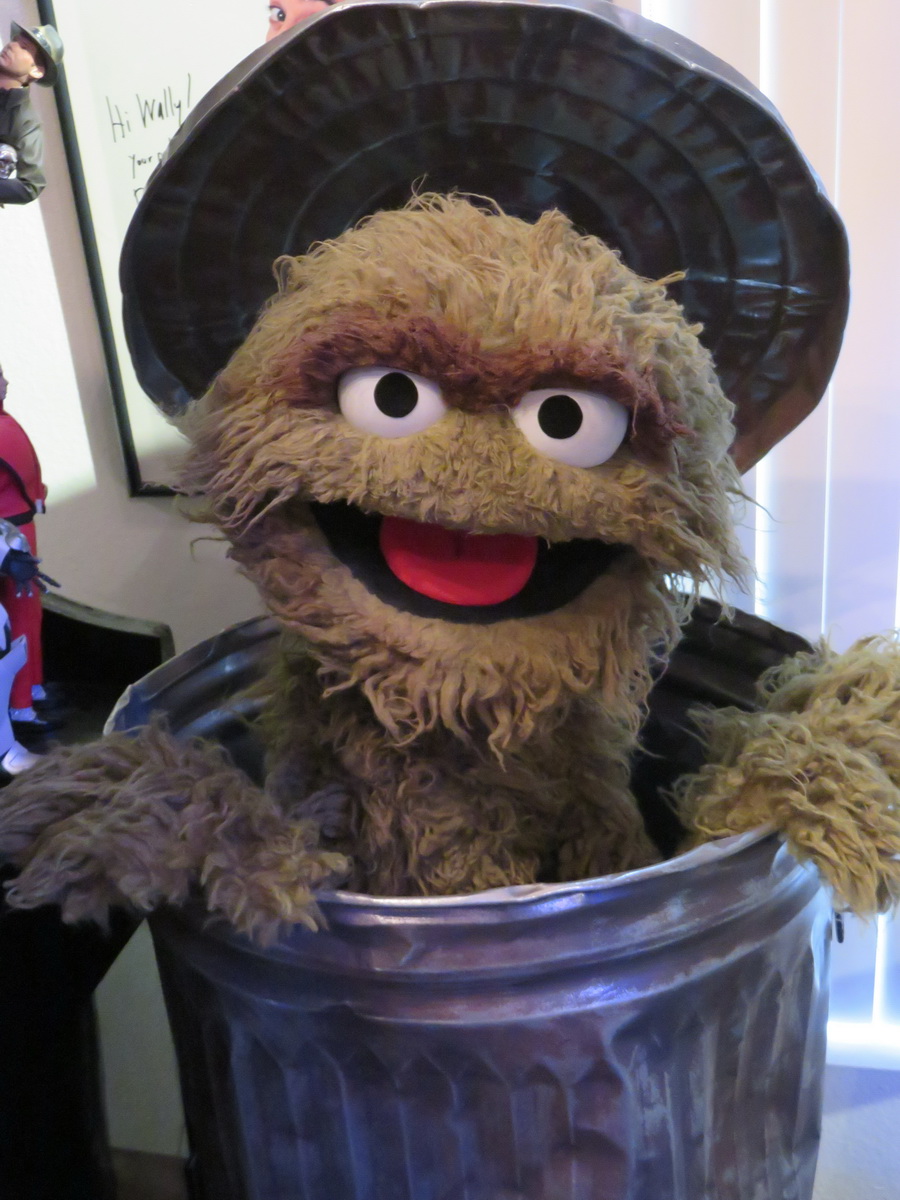
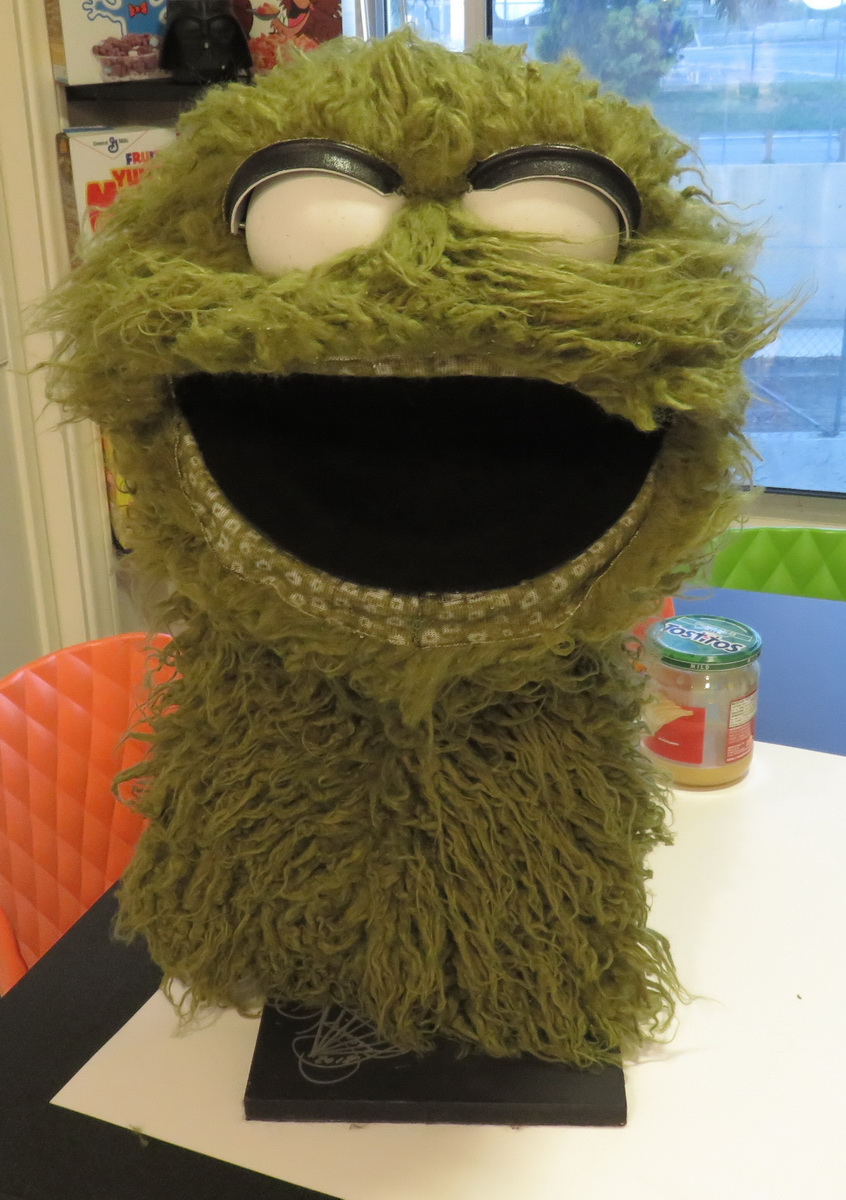
Since I was modeling mine after the “vintage” Oscar of the 70’s, I found as many pictures of his profiles as I could find. But they were rare. I had to go on YouTube and look at Oscar videos and get screenshots when he would turn his head. Though the Oscar of today has a stubbier head in profile, I like the more sloped, tapered head Oscar had in the 70’s. It took me quite a long time of sculpting, adding and subtracting foam pieces to get the right look. But it was worth it. I especially like how the shape of Oscar’s head cuts back in at an angle at the base of his skull. That’s true vintage Oscar.

The black fabric I used in the mouth is a non-light reflective fabric similar to that which is used by a film crew when they want to block out light. I glued the fabric to the mouth plate with plenty left over on the bottom for the lower jaw. When that was set I aligned the lower jaw to the rest of the head and attached the fabric to the “C” shaped piece of plastic for the bottom mouth plate. I had to be sure not to stretch the fabric too tightly across the mouth plate because I wanted to give it lots of room to “sink in” once the tongue was added later.


Speaking of the tongue, I first made a pattern on paper that I liked. Then I traced it on to a piece of ½” thick foam rubber and cut it out. I started to sculpt the edges with a small pair of very sharp scissors, trying to round out all the angled edges of the foam. Sculpting foam is fun, but electro static will make the little pieces of foam that you’re cutting away stick to the scissors. I remember this problem when I was sculpting foam as a kid, and I had to coat my scissors with a silicone spray. I bought some spray paint suitable for painting foam rubber and painted the tongue.
I took the finished head to Alex at Alex in Wonderland in Burbank. They specialize in making all sorts of costumes and creatures for the film and television industry. And they’re huge Muppet fans! Alex was going to design a covering for Oscar’s head out of muslin. Once I approved it she would cut it out of the faux alpaca fur, stitch it together and hand it back.


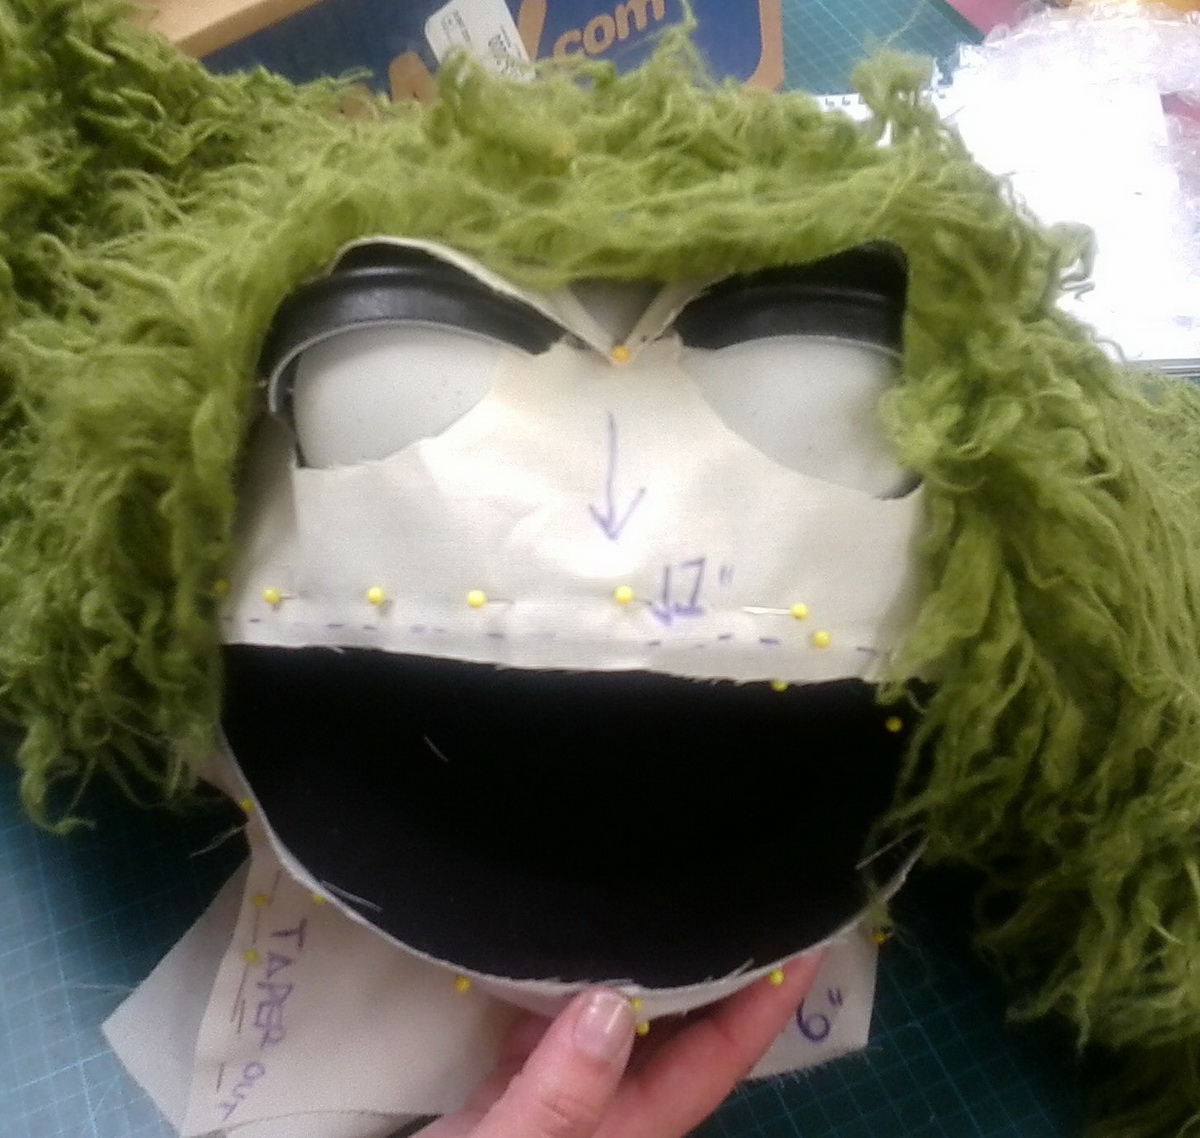
The pattern she made was perfect and needed very little (if any) alterations. I picked up the fur covering and foam head and took him back home. This was just before the country started locking down because of the Covid-19 virus. So would have plenty of time to work on Oscar during the lockdown.
She had pinned the fur into place on the foam head, so all it needed now was to be glued into place. Since the most important part of the head were the movable eyelids, I started on those first by trimming and gluing the edge of the fabric to the back half of the eyelid piece, just after the wire piece. I made sure I had lots of fabric so the eyelid piece could travel back and forth without restriction.
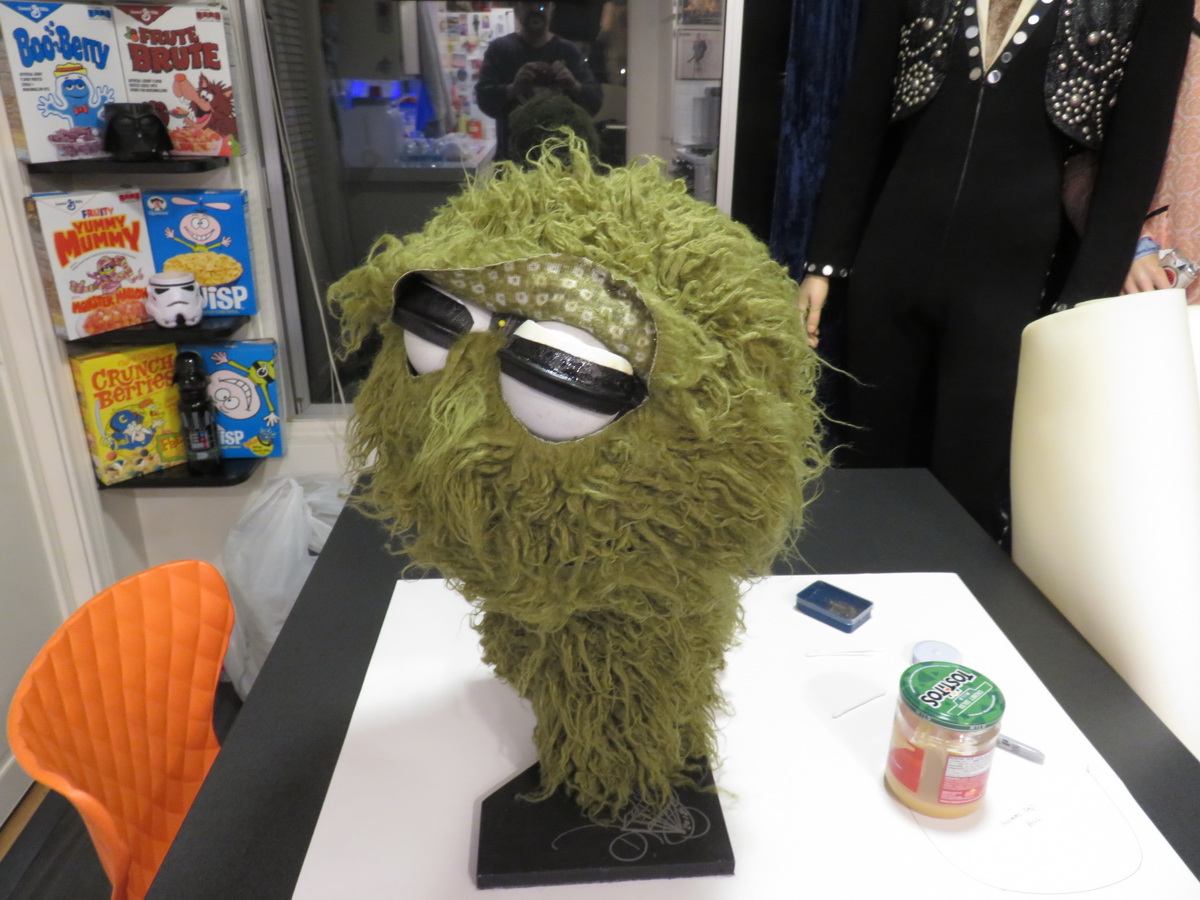
Then I precisely measured and trimmed the fabric that would go around the eye pieces. It’s important not to leave too much, and really important not to cut off too much. The fabric has to butt up against the edge of the eyeball pieces exactly. I marked out the dimensions on the back of the fur and trimmed them gingerly; never cutting the front of the fur. (When cutting fake fur you should never cut from the front, only the back, which will prevent you from accidentally cutting off some of the length of the pile that you’ll need later.)
I applied some Barge glue to the foam around the eyes, and applied some Barge glue to the back of the fur. When both areas were tacky, I pressed the fabric into place under the eyes perfectly. Then I glued the rest of the fur to the front of the face. I also glued the fur to the lower jaw, the sides of the head, and the base of the skull. Alex told me to only glue the tension areas where there would be movement. I didn’t need to glue the fur down to the top of the head at all because the fabric will just naturally lie there on its own. Because the pile of the fur is so long, I had to bobby pin the fur out of the way in most instances so it wouldn’t accidentally get in the glued areas while it was being applied.
On most Muppet’s mouths there’s an overlap of fabric that goes from the face fabric into the outer edge of the mouth’s inside. On the back of the fabric I made very specific measurement marks, and trimmed the fabric to the size I wanted. I put glue on the inside edge of the mouth, as well as the fabric itself. When it started getting tacky I pressed the fabric down and let it set.


When faux fur is trimmed the edge of the fabric’s weave is usually visible. This ruins the look of the puppet, so I referred back to a technique that I used to use all the time when I was making puppets as a kid. I put a thin line of glue just on the edge of the fabric with a toothpick. When the glue gets tacky I “bend” the fur over on to the glue and press it down. This helped to cover up the fabric’s weave and make it undetectable.
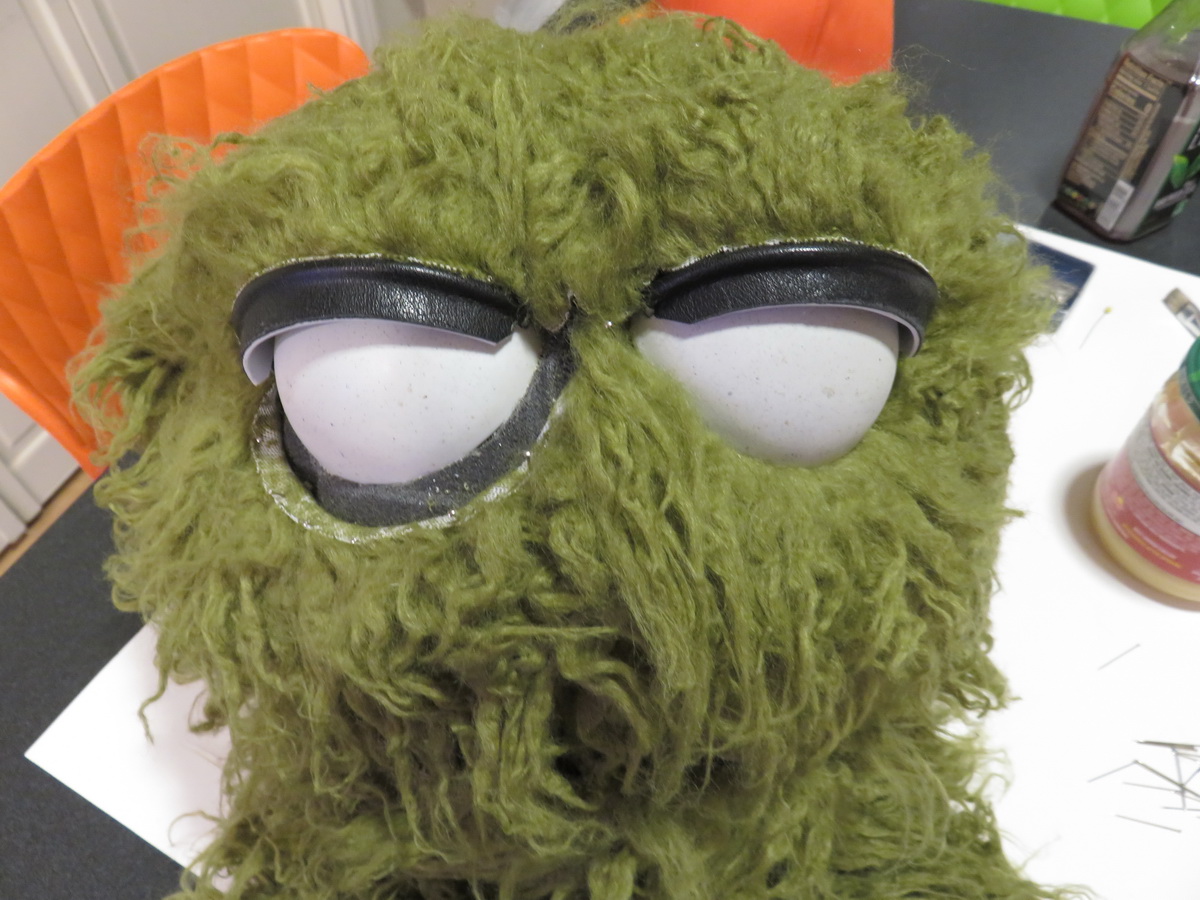
The original brown faux alpaca fur I bought for Oscar’s unibrow (which I ended up using for my Rowlf puppet) wasn’t reddish enough for Oscar’s unibrow. Luckily I found some perfect fur on eBay from the U.K. which looked perfect. With the green fur glued perfectly into place on the head, I pinned some tracing paper over his eyes to create a pattern for his unibrow.
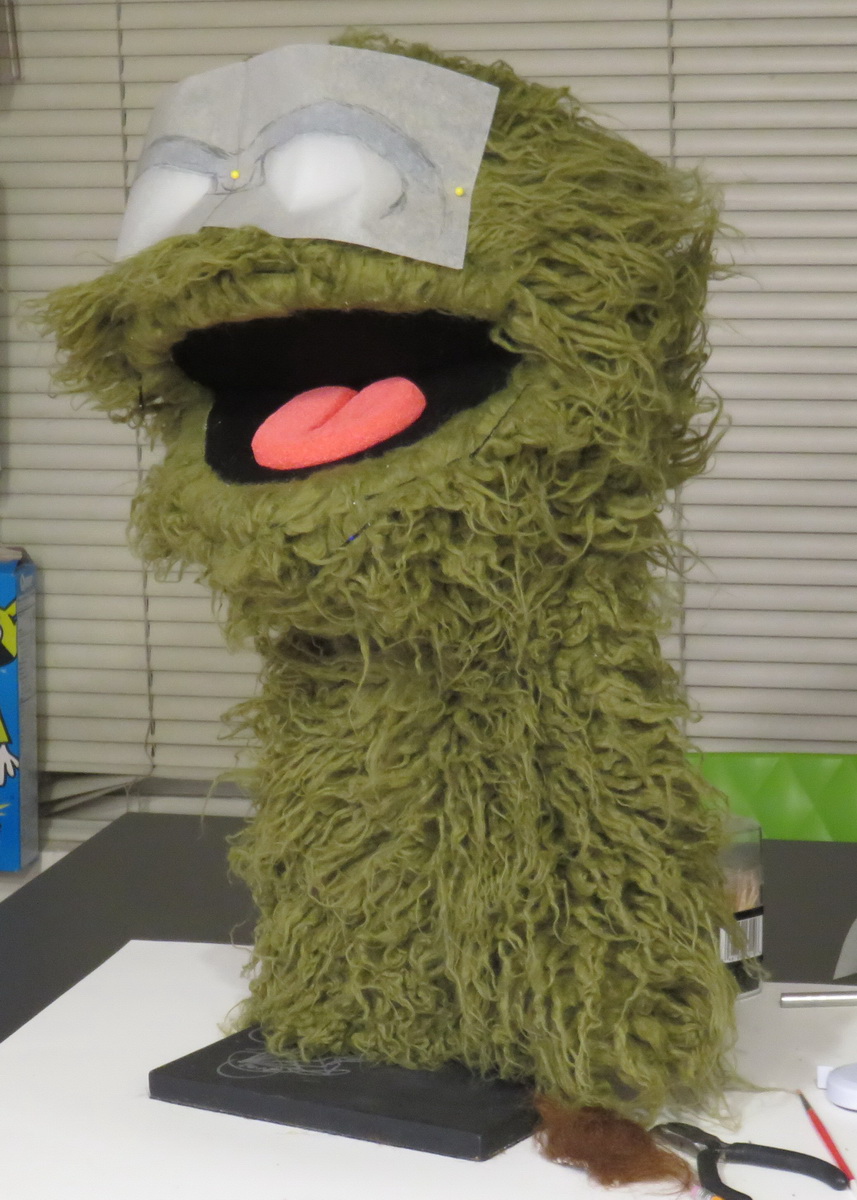
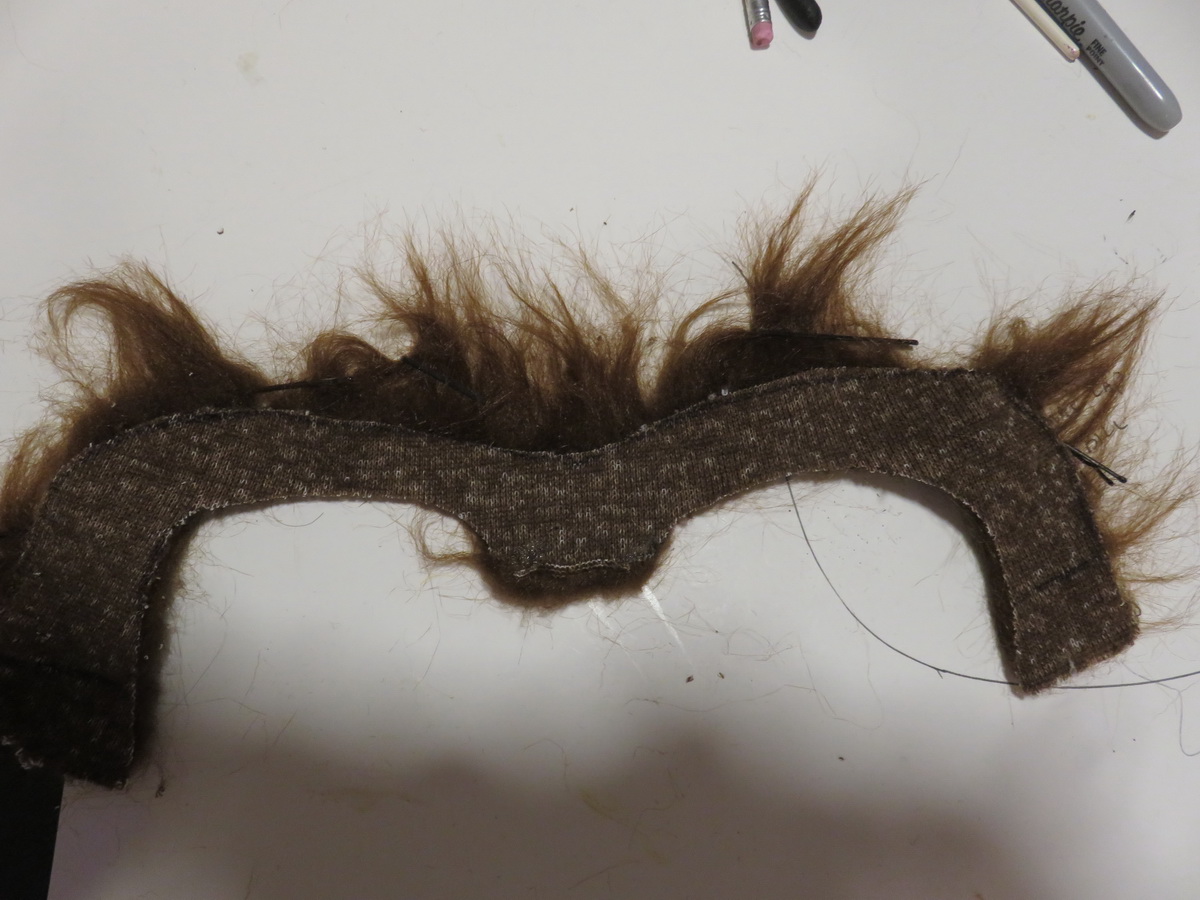
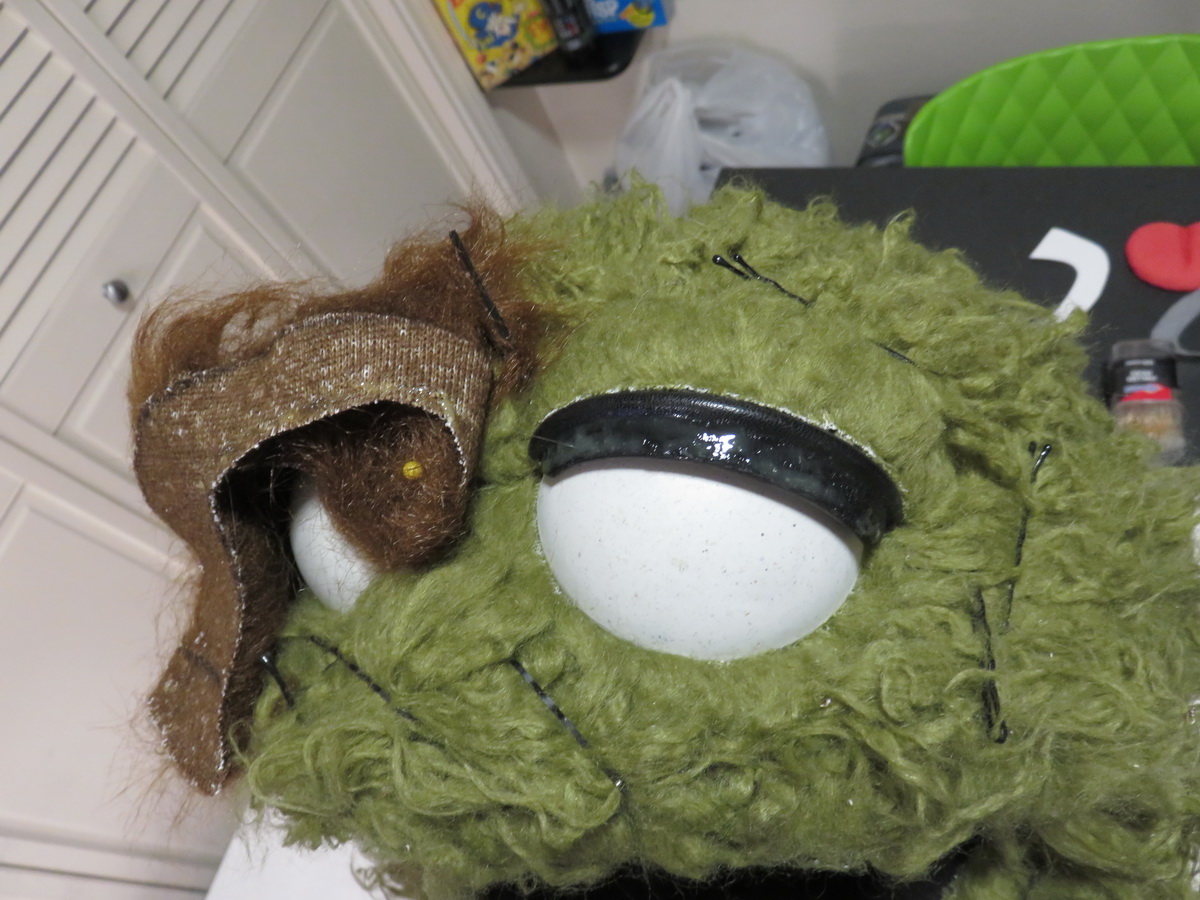
I transferred the pattern to the back of the reddish-brown fur, cut it out, and attached it to the edges of the eyelid pieces. I made sure to leave plenty of extra “flex” room in the middle between the eyes for when the unibrow moves up and down. I matted and compressed the fur to take down some of the bushiness of the pile. The unibrow will also benefit from some trimming, which will come toward the end of the process.
When I had the eyelid pieces made I requested that they be made in black plastic. But since the plastic would have had to have been special ordered, I told him to just make them out of white and I would paint them. But I didn’t do it early on, and I ended up regretting it. The insides of Oscar’s eyelids were still white, and though I initially didn’t think they’d be that noticeable, I realized now that they are.
I took one of the rejected plastic eyeball pieces that I had lying around and cut it to fit over Oscar’s eyeballs. This would protect the painted eyeballs from any drippage that would occur as I painted the insides of the eyelids. I taped them into place with painter’s tape, and even pinned them at the bottom so they wouldn’t move as I was working.
With a long, thin brush, I painted the insides of the eyelids as best as I could. While I had the plastic eyeball covers on, I also took the opportunity to glue down some of the edges of the eyebrow. Remember, if any Barge glue gets on the surface of the painted eyeballs it will melt the paint.
I noticed on the original Oscar, the builders left his unibrow fur slightly longer in the areas where the wires are inserted into the eyeball pieces. This is to disguise the unibrow mechanism from the viewer’s eye. Everything had fit together perfectly. The edge of the reddish-brown fur on the eyebrow was visible on the edge of the eyelid piece. So I mixed together some reddish-brown acrylic paint to match the color and painted the weave of the fabric so it blended in.
Since Alex’s pattern only included Oscar’s head and neck, I engaged the services of my regular seamstress Shelley to create the main body. Once she had the body finished I took the head to her for attachment.
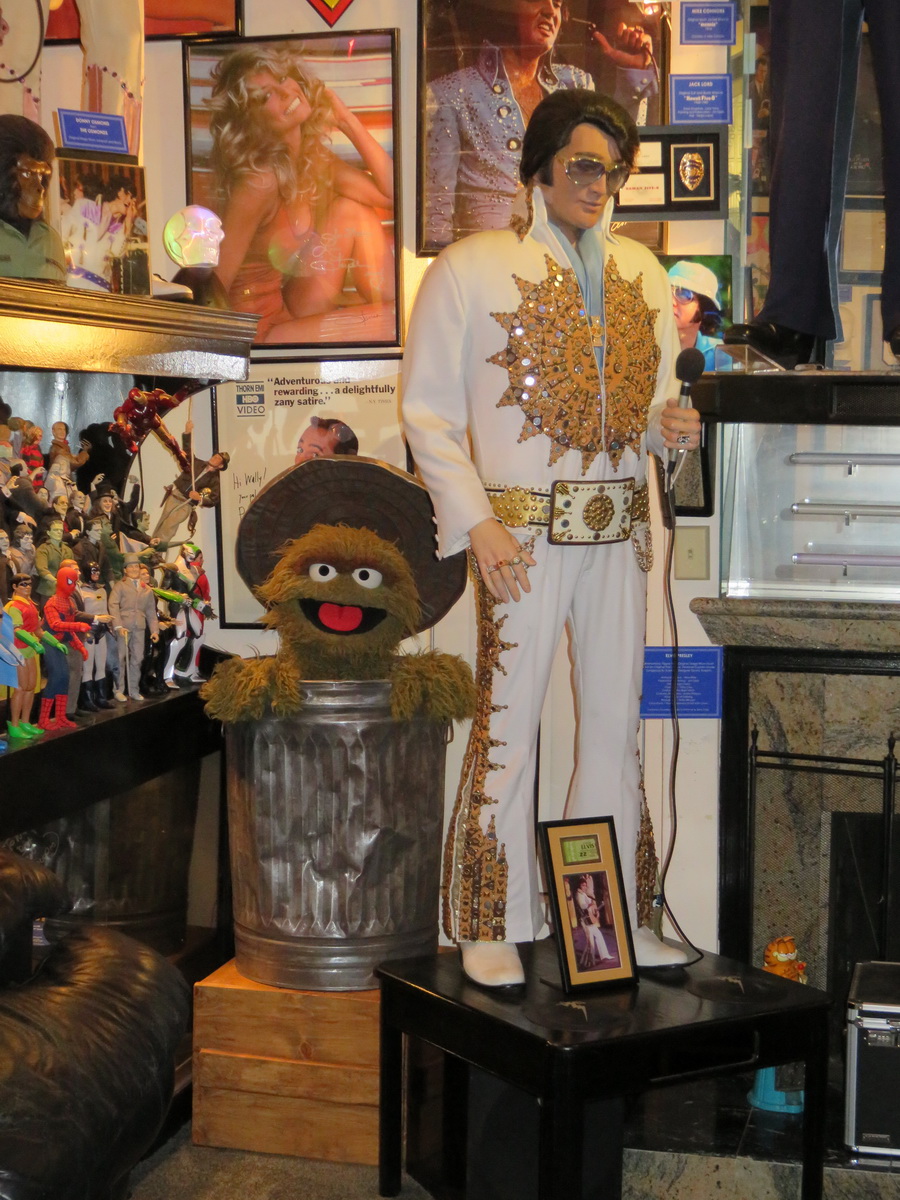
I bought a new 31 gallon metal trash can which seemed to fit the size perspective of my puppet. Jim Ojala would bang it up, paint it and add rust. He’d also put a hinge on the back so the lid opens wide to take Oscar out, but has a stopper on it so it never touches the puppet when it’s in the can.

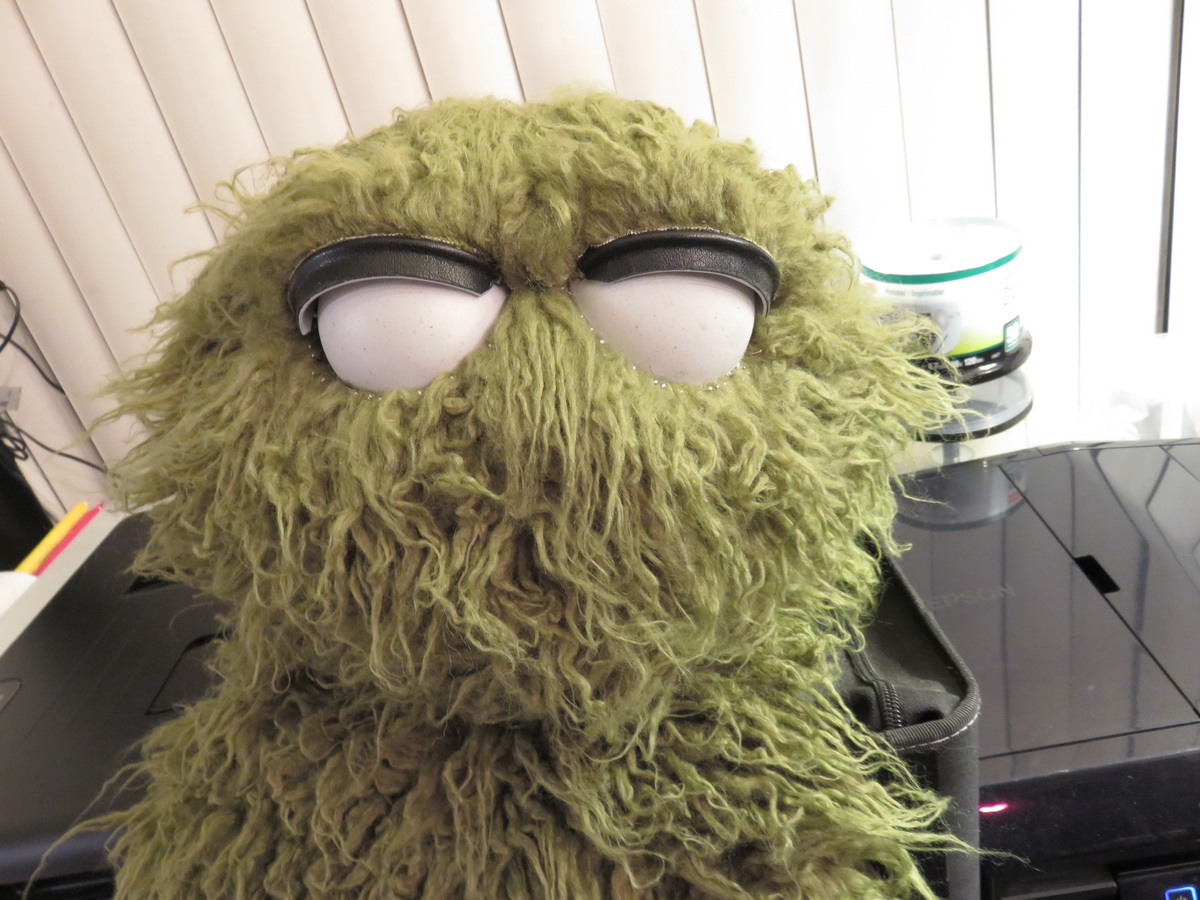
The hair wizard I’ve known since 1993, and who has done the hair on all my lifesize figures, came over to do the delicate cutting on Oscar’s face. Sergio Lopez is a master with scissors and has an eye for detail. The fur on Oscar’s face below his eyes is trimmed very closely to properly display the characteristics of his face. On the sides it gradually blends back into the long, matted hair we all know and love. But one wrong move with the scissors and you’d have an unfixable error on the puppet’s face.
Sergio’s technique is to do less to begin with, let me see it, and then cut a bit more. It’s better than cutting too much to start, because then there’s no turning back. Sergio cut the hair on Oscar’s face in stages, and finally we agreed that the cut he gave him was the finishing touch. He also put a specific product on the fur to make it look matted.
Then he turned his attention to Oscar’s unibrow. The unibrow on some Oscars have been bushier than others, but since I’m going with a more “vintage” Oscar look for mine, we wanted to minimize it a bit. Sergio did a nice job of trimming out parts of it, but leaving other parts long, and then putting on some product to matt it down. Once Oscar would get his body put on, I’d trim the palms of his hands, because I didn’t want to make Sergio come all the way to Hollywood again.
But he taught me how to cut it properly. When trimming fur, you always trim IN to the fur, and not across. Hands I can handle, but when it comes to something as important as the face, I needed to call in the master!
Jim Ojala brought over the distressed trash can and it looked marvelous. The hinge on the back is a pressure hinge, so it will stay open at any angle you please. Just squeeze in the center button and adjust it accordingly. The first day I put Oscar in the can, he looked completely at home!

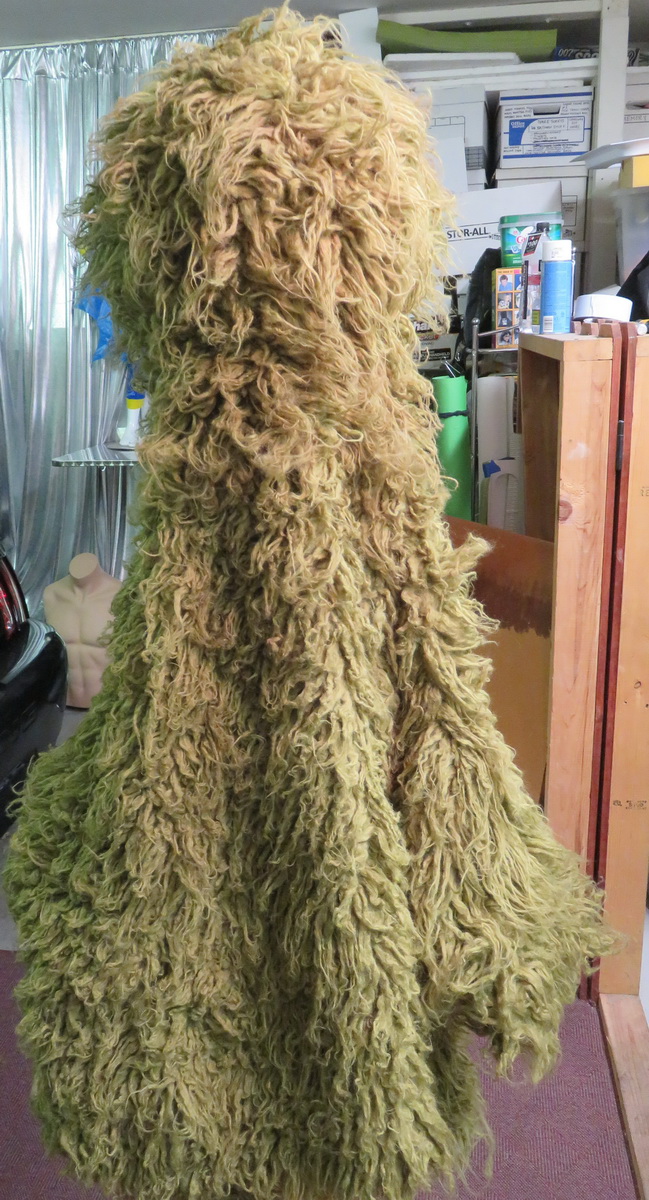
My seamstress Shelley had been working on the body for a quite a while, as she wanted to get it just right. Unlike the body she did for Rowlf, she wanted to make sure to cut Oscar’s body in such a way that he would look full and have contours when sitting in his can. She didn’t want him to look like a sack of limp fur.
When I picked him up his body looked a bit too large for his head, so I took him home, laid him out and made some decisions as to where some fabric needed to be taken out. I took him back to Shelley and within a few days he was back looking perfect!
The same day I picked him up, my paint for the tongue arrived in the mail. I came home, painted the tongue and let it dry. Then I masked off all but the center line and painted over with a darker red. I put it aside to let it dry completely.
I took a can of brown spray paint and sprayed portions of his fur to make him look dingy and grimy. Since I was going for the dirtier-looking Oscar from the past I sprayed him quite liberally. But because the can of paint was old, the nozzles kept clogging. So I found other nozzles I could use. But I got about 5 sprays out of them and they would clog again. Finally, when I deemed that I had sprayed him enough, I took paint thinner on a paper towel to his fur and make the painted areas look more like stain. It ended up looking quite good.
When the dirtying up process was finished, I glued in the tongue permanently. I also cut some 1” spheres out of black velvet and measured out the areas on the eyeball pieces where the pupils should sit. The perfect position was for the edge of the pupil to be placed at ¾ of an inch from the inside of the eye, and ½ of an inch up from the bottom of the eye. I measured, then measured again, and masked off the area on the eyeball piece with safe painter’s tape. I put Barge glue in the area between the tape, snipped out a small wedge on the black velvet pupils (so it would lay perfectly on the contour of the curved eyeball piece) and put Barge on the back of them. I allowed the glue to get tack, and then I gently applied the pupil to the eyeball piece. I flattened it out with my finger, made sure the area where the wedge had been removed joined up perfectly and seamlessly, and let it dry.
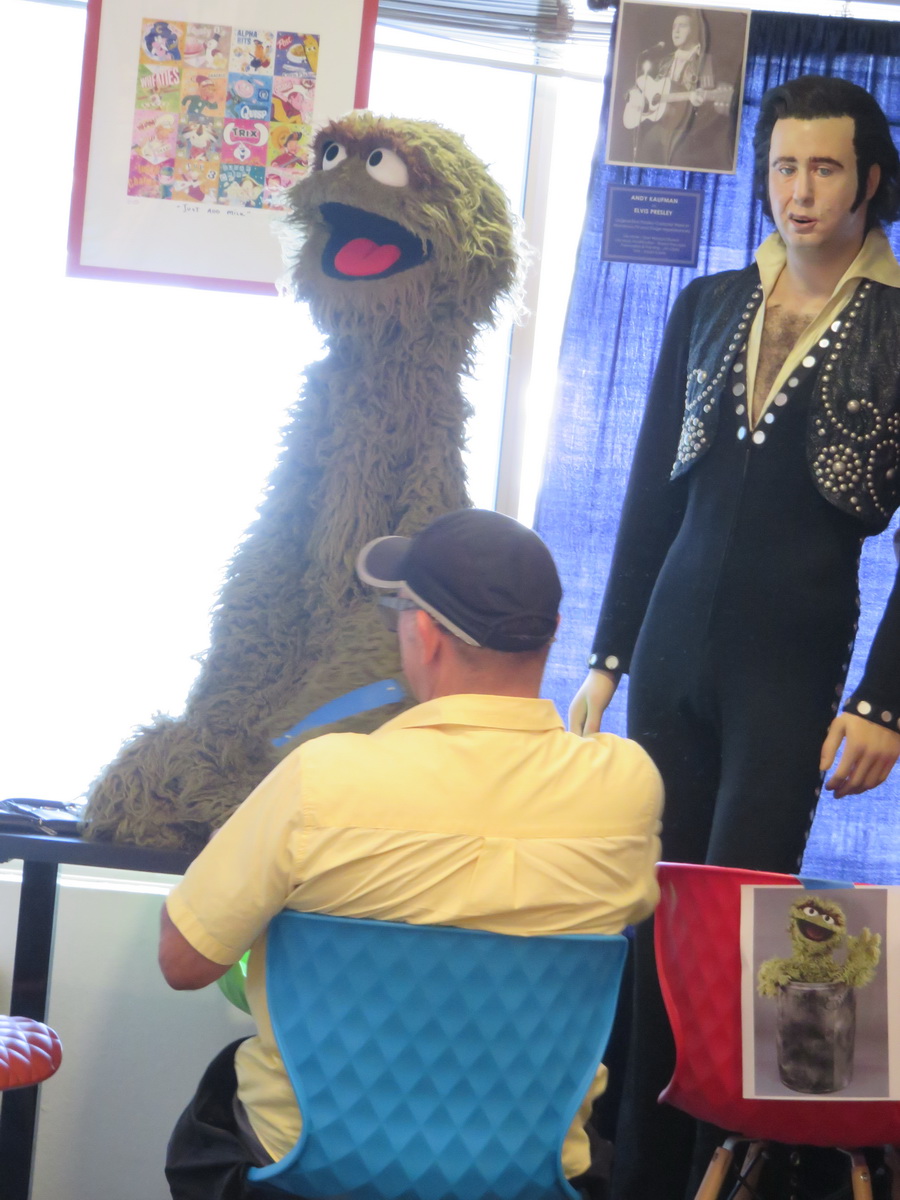
I found a perfect pedestal for him to rest on temporarily, until Kyle at Plastic Depot could make the final support rod in Plexiglas. In order for him to have the perfect position in the trash can, and attain the perfect height in relation to the can, I determined that the total height of the support rod should be 36 inches.
I placed him in his trash can and he looked right at home! Sergio Lopez stopped by one last time to trim the hair on Oscar’s palms. Cutting faux fur like this can be a delicate issue, because if you cut too short you’ll see the weave of the fabric underneath. But Sergio did his usual stellar job!
My pal Joe Pendleton fabricated a 15” X 19” X 19” wood box and distressed it to look like it had been left outside for a while. It was what I had determined as the perfect height for Oscar’s display. It wasn’t too low for people to view at eye level, and it wasn’t too high to block the artwork on the wall behind him.

The final touch was to build a support rod and stand to keep him on when he’s inside his trash can. The base had to be small enough to fit inside the can, and the support rod had to be just tall enough so when he peeked out the top of the can, the perspective was right for the optics I was trying to attain.
I had drawn up some plans and submitted them to my pal Kyle at Plastic Depot a while back (he does all my puppet stands and cabinets) but with the Covid 19 protocols going on in stores, he was quite busy fabricating “blast shields” to protect the retailers’ checkout staff. Virtually all the Plexiglas shields we see in our area stores were built by Kyle’s company. So I made other arrangements so as not to further burden his workload.
In my storage I had a solid wood base from a torso bust I bought a while back. A 7/8” dowel would fit perfectly inside the support, and I just happened to have one in my garage. I sawed it off to the desired height, drilled a hole through it one inch from the top, put a chunk of foam rubber on the top of the dowel, put a piece of armature wire through the foam topper, inserted it through the dowel, and tied it off on the other side. That way it would give Oscar’s head plenty of cushion to rest on.
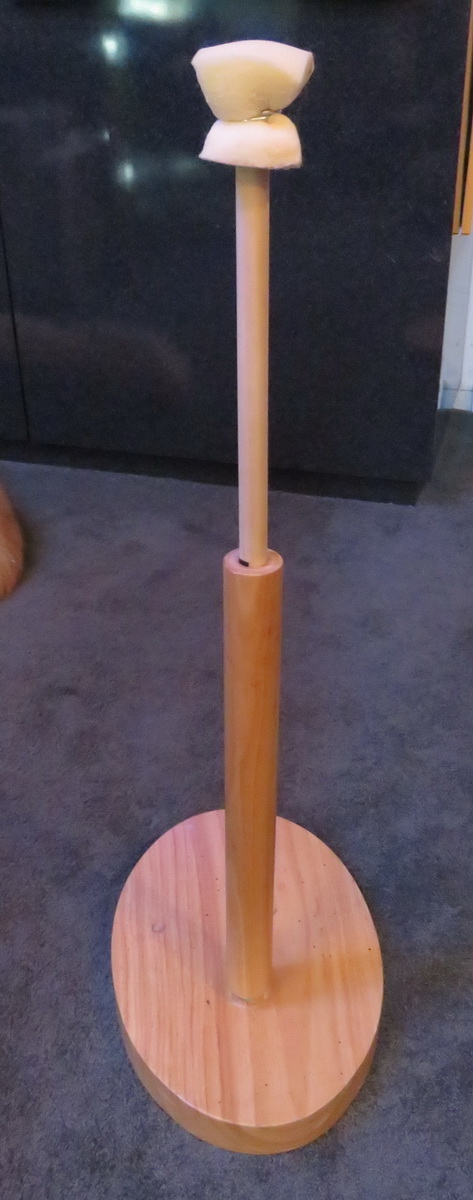

Just having a raw wood dowel for him to rest on may have damaged or dented his foam rubber head over time, with the continued pressure of the weight of the puppet. But the foam buffer should work nicely. The wire would keep the topper on top of the dowel securely, so when I pulled the puppet off the stand the topper won’t come off with it.
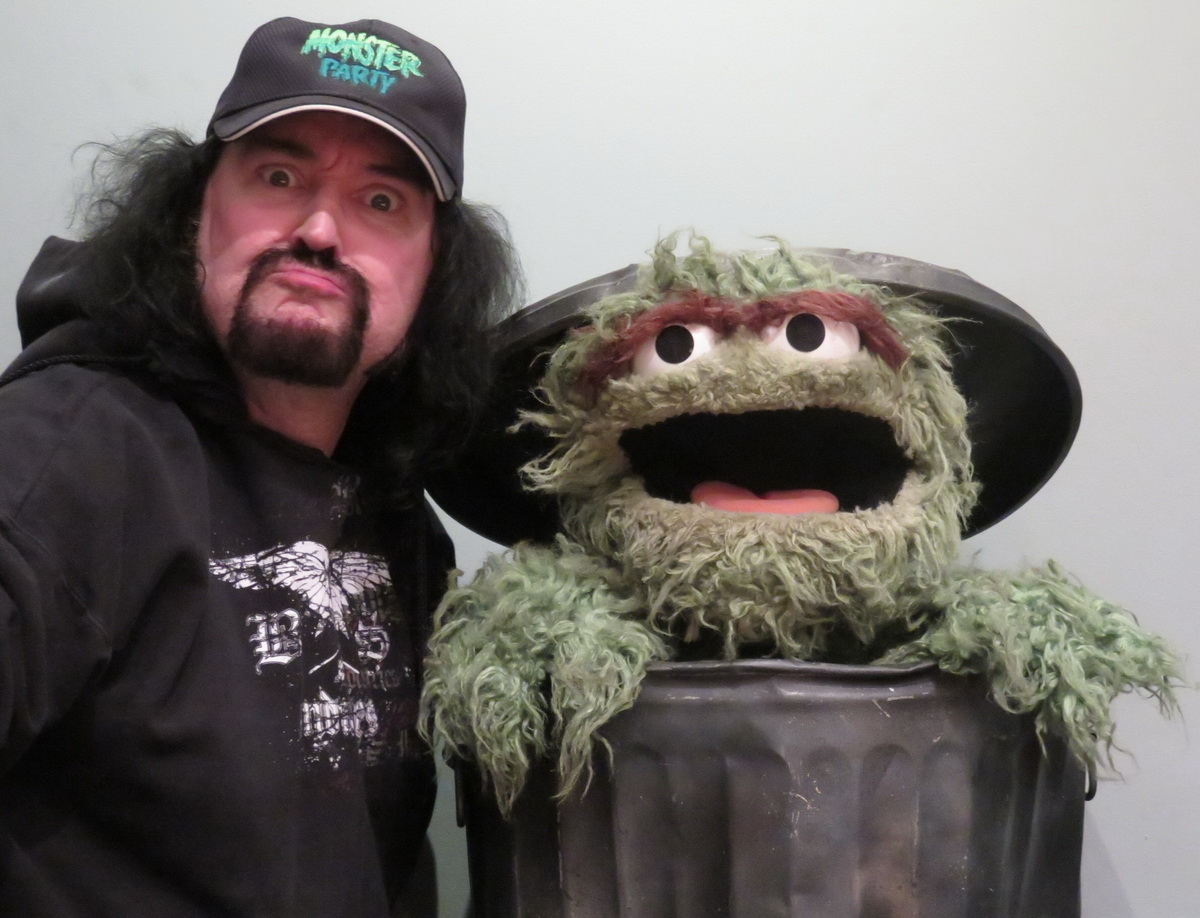
I placed the rod and stand inside the can, placed Oscar atop it, and took a picture. My Oscar the Grouch replica Muppet project, which I had started on Christmas Eve of 2019, was finally complete. And I’m VERY happy with the results! I learned a great deal from the experience. I hope you like him!