|
I've been an Elvis fan since I was a kid. I saw
him perform in Sioux Falls, South Dakota on June 22, 1977, about two
months before his death. About 6 months ago I got the zany idea to
take one of the animatronic Elvis busts made by Wowee and integrate
it into a full-sized mannequin...thus creating Robo-Elvis. The only
thing that would actually be articulated on Robo-Elvis would be his
head and neck, but I figured the striking visual of seeing a 6 foot
tall Elvis (complete with stage jumpsuit and microphone) talking and
singing when you walked into Planet Wallywood, would speak for
itself. Making something like this had been "always on my mind," so
I figured..."it's now or never." It was time to "follow that dream."
Alright, that's enough of the Elvis song references for now...
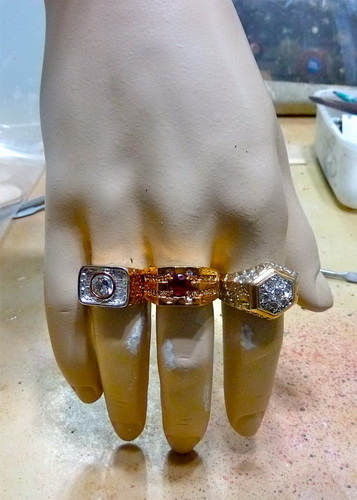
I also hit eBay to find replica Elvis jewelry. I had already purchased an actual Elvis scarf that he had thrown to a woman during a concert, and I was happy to be able to find a replica version of Elvis' Maltese Cross, and his TCB ring. But the jumpsuit still didn't seem right to me. So over Christmas to New Year's week...I got busy.
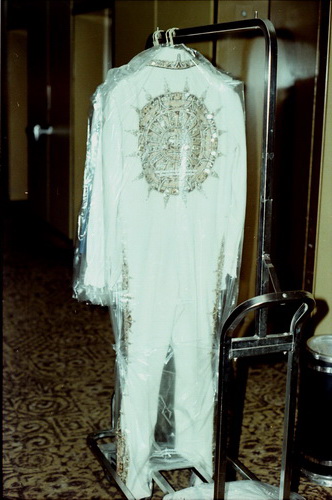
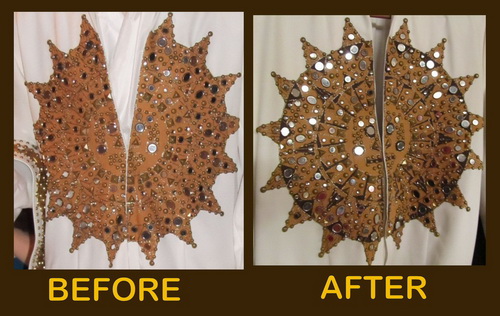
The butterscotch colored appliques, covered in studs and mirrored rhinestones, were nice. But they just didn't "pop" quite yet. After consulting more of the Aztec Sundial photos from Graceland, I determined that the design was missing brown highlights. Once I started painting those in, the design really started to come alive with depth, dimension and pizazz. And since the suit would never be laundered, I was able to use the same brown acrylic paint I used on the belt. So the color match would be perfect! Here's a look at the BEFORE and AFTER photos. Quite a difference! I literally stayed up all night during Christmas break, listening to Christmas music on the satellite, and painting away until my eyes grew bleary in the Chaney Room!
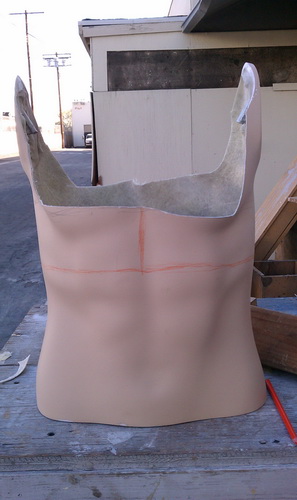
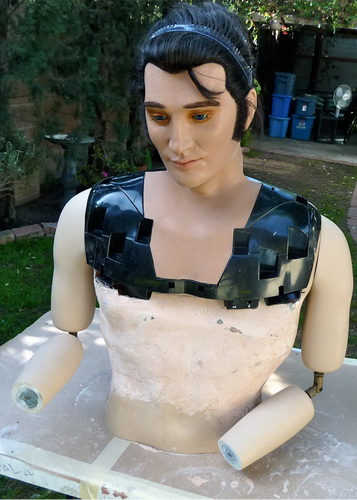
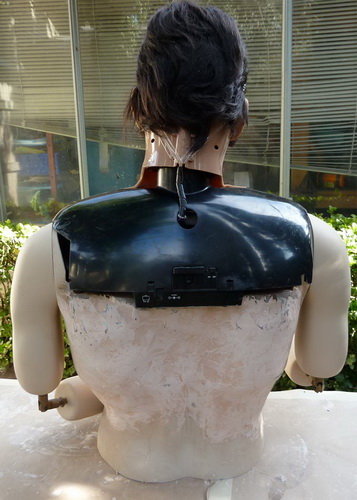
Meanwhile, Jim was sending my progress photos of the integration. He padded out the torso of the mannequin to minimize the size difference between the bust and the torso of the mannequin. Jim had to literally crack open the mannequin's torso and extend it several inches to accommodate the bust. Once he had it to the correct circumference, he fiberglassed it in seamlessly. He had even started to apply some of the costume jewelry rings I had supplied him with.
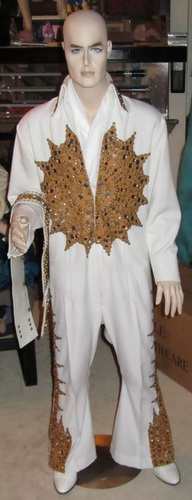
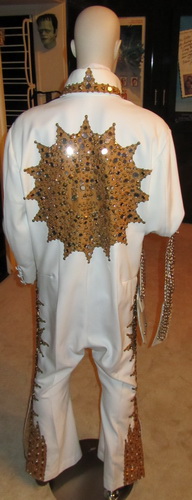
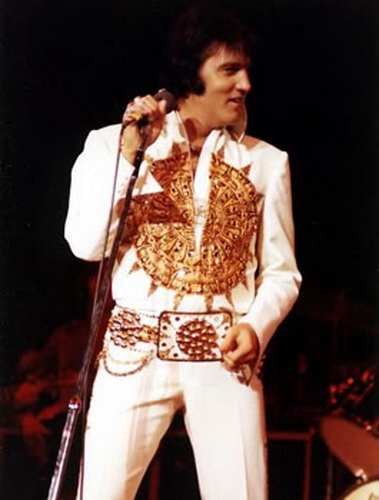
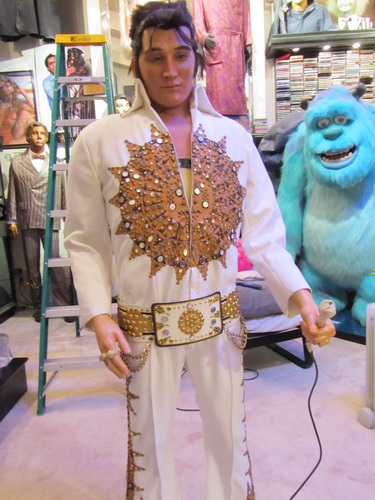
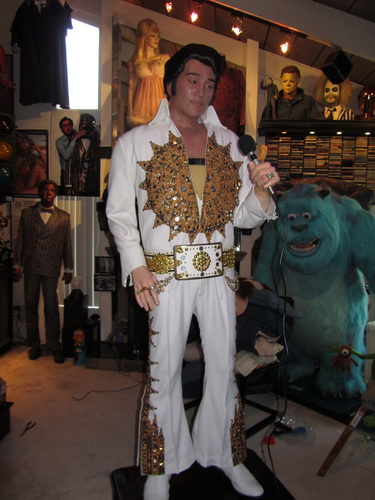
Shortly after the New Year, Jim came by to show me the progress. We assembled the mannequin to get an idea of the work we had yet to do. Obviously, the original Elvis scarf would be folded over the chest to disguise the seam where the bust meets the torso, and the replica Maltese Cross will hang over the scarf similar to how it is in this photo of Elvis on stage. Jim is also going to paint the entire mannequin to look more lifelike, with skin tones and textures that look more realistic than those on the animatronic bust and the mannequin.
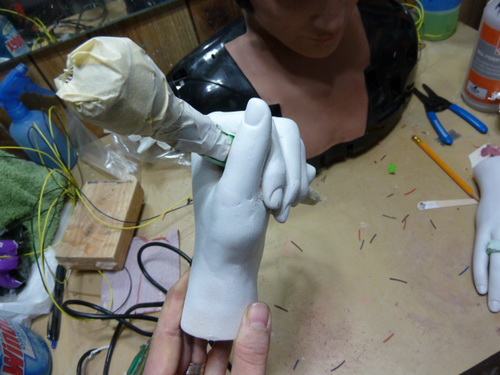
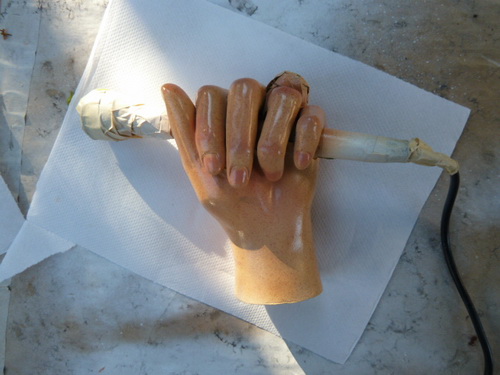
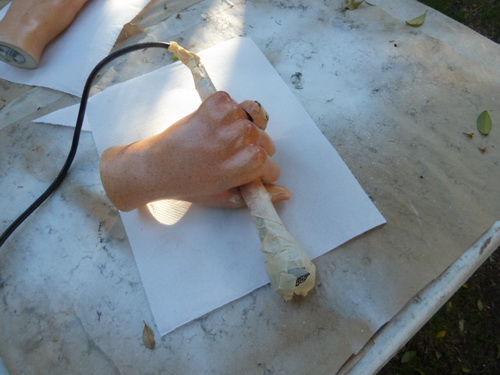
I also purchased a vintage 1970’s Electro-Voice microphone, similar to the ones Elvis used to use on stage. Jim will be reforming the mannequin’s left hand to achieve a more realistic grasp on the microphone. Luckily, thanks to the mannequin’s bendable elbows, Robo-Elvis will be able to hang his right thumb in the chains of his belt, like the real Elvis used to do.
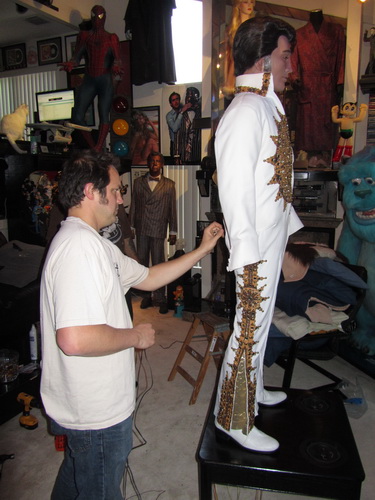
One of the final procedures will be to tailor the jumpsuit specifically to the contours of the mannequin. There’s a lot of work to do here, most of it involving taking up the crotch, and my seamstress Kathy Pillsbury drops by to take the measurements under Jim’s supervision. My contractor Terry, who used to be an Elvis Tribute Artist, donated a pair of his white Elvis boots for the display!
01-23-12 update.... The IR sensors were housed on the pocket of the bust's costume, (disguised as rivets) but since we're changing out costumes, the wires of the IR sensors needed to be extended as well. Here you can see all of the soldering and wire work needed to extend the operational wiring.The IR sensors were housed on the pocket of the bust's costume, (disguised as rivets) but since we're changing out costumes, the wires of the IR sensors needed to be extended as well. Here you can see all of the soldering and wire work needed to extend the operational wiring.
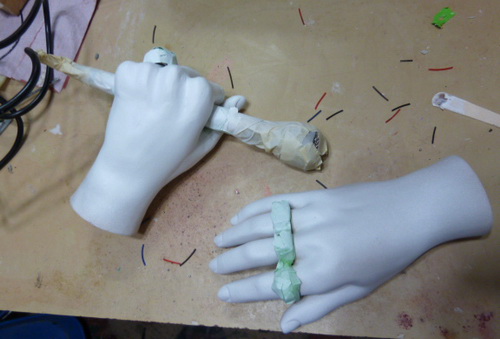
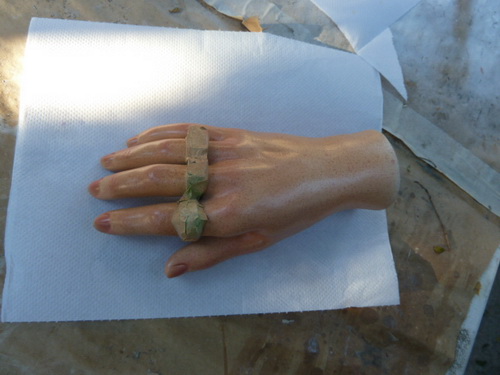
Jim also has had to reform some of the fingers on the mannequin's hand in order to put a grip on the microphone. Here they are, completely reformed, andd primeredd. Ready to be painted a lifelike color scheme.
01-31-12 update... Jim recently painted the Elvis bust a more realisticc palorrthan it had when it was manufactured. He also masked off the rings and microphone so he could paint the hands to look more lifelike. Once the gloss settles as the paint dries, the hands will look very realistic and fit the mannequin well.than it had when it was manufactured. He also masked off the rings and microphone so he could paint the hands to look more lifelike. Once the gloss settles as the paint dries, the hands will look very realistic and fit the mannequin well.
The sensors on the original animatronic Elvis bust were disguised as rivets in his jacket pockets. But Jim will need to extract them from the fabric so Terry can integrate them into the platform. Here's how they look from the front and from the back. Obviously, Jim will need to extend the wires considerably in order to make the robot work effectively via remote control..
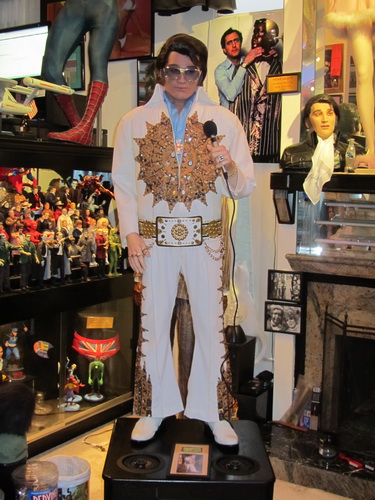
02-27-12 update... Kathy brought over the freshly tailored jumpsuit and it looks amazing. It fits the mannequin perfectly and really brings the image of Elvis to life! She suggested attaching some velcro to the inside of the belt where it hits the sides of the hips. I would also need to attach corresponding velcro to the points on the jumpsuit where I want the belt to rest. The weight of the buckle makes it necessary to secure the belt to the costume so it won't slip.
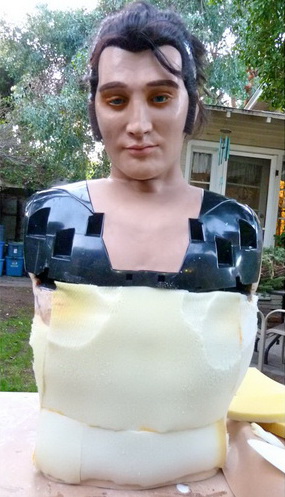
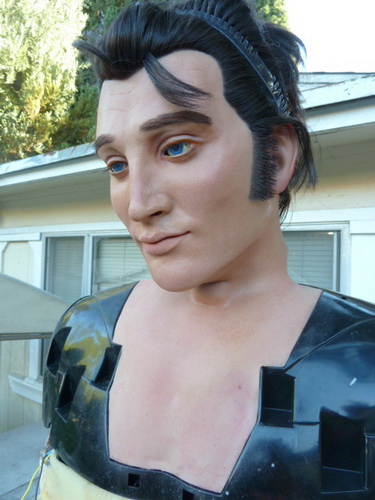
When Jim arrived with the mannequin he showed me the
mannequin's new paint scheme. The silicone face is much more
life-like than what you get by buying one of these animatronic units
off the shelf. And the hands have been painted very realistic as
well. The masking tape he placed over the rings and microphone to
protect them from the airbrush is still attached, but will be
removed just before unveiling to preserve their sparkle.
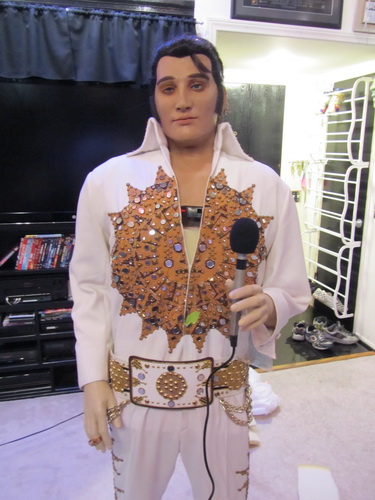
My special effects pal Jim Ojala came by
mid-afternoon with Robo-Elvis. Today was the day we'd be setting it
up! The planets had aligned at long last! Terry my contractor came
over, as did Sergio my hair and make-up guy. While Terry and Jim set
up the bottom half of the robot on the pedestal, Sergio took the top
half into the Chaney Room and styled his hair. He used several
reference photos of the real Elvis from some of my photo books. When
he was finished it looked terrific! Jim and Terry were running wires
down the length of the mannequin, soldering connections and feeding
cables down through little holes in the platform. Then we started
dressing him in the jumpsuit. We got him all set up and we turned
him on. It was amazing. Especially when I added a pair of Elvis’
original glasses and original Elvis scarf to him! I also added a
Maltese cross necklace (just like the one Elvis used to wear) and a
bracelet. Though it's not completely done yet (still waiting to
attach Velcro to the inside of the belt and the waistline of the
jumpsuit so it will never move, as well as waiting for some artwork
on the speaker grilles) but it was amazing! The animatronic Elvis
says random stuff when he's idling and it's great. He'll be quiet
for a bit, but then say the oddest things out of the blue. I was
looking all over for my dog Roxy (who was trying to constantly get
in the middle of our workspace to get pets and love) but she wasn't
around. I said, "Roxy!" Just then Robo-Elvis blurted out "Where'd
you go, honey?" I looked at Terry, he looked at Jim, Jim looked at
Sergio and Sergio looked at me. A chill ran down our spines. It was
one of those coincidental things that you could never plan in a
million years! When we stopped being weirded out, we laughed out
loud! Then we had Robo-Elvis sing "Hound Dog," and halfway through
the song Roxy started barking along. It was very funny!
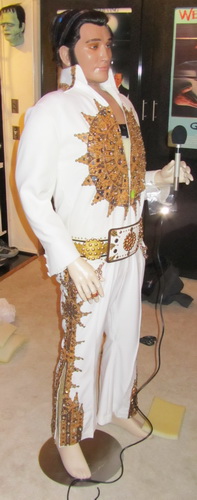
I picked up some Velcro to hold up his belt, since the mannequin
doesn’t have much in the hip department. I’ll have my seamstress
Kathy stitch a row of Velcro to the costume all around the hips.
That way the belt will remain secure on the robot and won’t slip
down. I also bought some thin, black elastic to hold his glasses on.
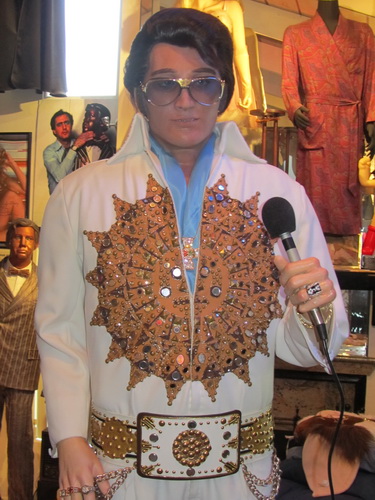
The glasses the robot is wearing are Elvis’ actual, personal
glasses. Complete with the gold TCB logos on the sides, and the gold
EP in the center. I bought then from a collector who purchased them
from the estate of Dennis Roberts, Elvis’ eyewear designer. Since
the robot is very animated, and moves his head quite a bit, I didn’t
want the original glasses flying off his head and crashing to the
floor. So I tied a piece of thin, black elastic into one of the
holes on the sides of the glasses, looped it around the back of his
head under his wig, and tied it off on the other side of his
glasses. That way they’d be secure and you’d most likely never see
the elastic.
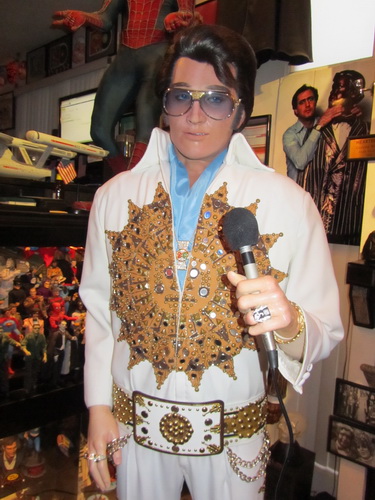
Kathy came by to stitch the Velcro to the jumpsuit, which allowed us
to attach the belt to the jumpsuit in a more secure fashion. She
also attached the tips of the collar to the jumpsuit so they
wouldn’t spread out when the robot moved his head around. I put
cardboard supports in the bottom of his pant legs to make the bell
bottoms flare out more. It helped to fill them out for a crisper and
cleaner look. The creator of this particular suit didn’t use any
innerfacing in the pant legs so the cardboard was much needed for
the visual effect. Once the cardboard stays were in place where I
liked them, I stitched them in permanently.
|